Archives for January 2014

How Often Should You Brew in 2014?

Screen Shot 2014-01-09 at 4.29.56 PM

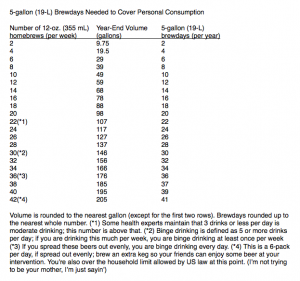
How often you would need to brew 5 gallons (19 L) of beer to cover your own personal level of beer consumption for a year. Click the chart to enlarge.

Around this time of year, people make resolutions — often to brew more — and perhaps even draw up a brewing plan for the coming year. If you’re wondering, “How often should I brew this year?,” there are a couple ways to look at it. The easiest answer is, of course, brew as often as possible — it’s your hobby, enjoy it to the fullest. A slightly nerdier way of looking at the question would involve planning your number of brew days to meet your anticipated beer needs.

Brewing generates beer, of course. At the end of the year, it’s possible to have brewed either too little beer or too much beer (if you accept that there is such a thing). Hitting the sweet spot between these two outcomes — having brewed exactly the right amount of beer — can be accomplished with a little planning and dedication. Here’s how you plan for it.
[Read more…]

Partial Mash Methods (Brewpot Mashing with Colander Lautering)

DSCN0021

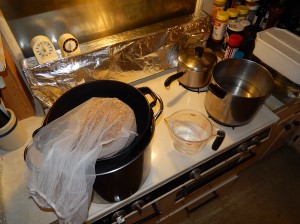
A colander sits above a 5-gallon (~20-L) brewpot. The grains were mashed in the small pot while sparge water heated in the medium pot.

As I mentioned in my previous article, partial mashing provides many benefits, especially for extract brewers. Procedurally, it is very similar to steeping specialty grains — you just need to hold your temperatures and liquid volumes within a certain range. There are a wide variety of ways that homebrewers perform partial mashes. Today I’ll explain one of the most common ways for stovetop brewers to do a partial mash. All you need is a steeping bag to hold the crushed grains and a colander large enough to fit on top of your brewpot. Standard spaghetti-draining-sized colanders will fit over many pots around 5 gallons (~20 L) in volume This method works best for partial mashes with 2–4 lbs. (~1–2 kg) of grain. I’ll explain tomorrow another method for performing larger partial mashes without switching to a full-sized, homebrew mash/lauter tun.

[Read more…]

Two Mash Out Options

IMG_2956

At the beginning of wort collection, it doesn’t matter if your grain bed temperature climbs above 170 °F (77 °C); tannin extraction is largely suppressed at mash pH.

At the end of your mash, you have the option of mashing out — raising the temperature of the mash to 168–170 °F (76–77 °C) — before recirculating and collecting your wort. The best reason to mash out is to make lautering easier. The hotter the mash, the lower the viscosity of the entrained wort and the easier it is to drain it away from the grain solids in your lauter tun. However, the difference in wort viscosity between wort at typical mash temperatures (148–162 °F/64–72 °C) and wort at 168–170 °F (76–77 °C) is not that great, and so many homebrewers simply skip this step without any noticeable negative effects. (For brewers who mash in a converted picnic cooler, often the volume of boiling water necessary to raise the temperature would cause their mash/lauter tun to overflow.)

I can heat my mash tun, so I usually mash out with the idea that at least it can’t hurt. (Plus, it requires me to stir the mash and that might help out my extract efficiency a little bit.) I like to tinker with my brewday procedures, and in this article I’d like to present two alternative ways to mash out besides the usual heat-and-stir and add-boiling-water methods. I’ve used the first option a number of times and it works fine. I accidentally did the second option a grand total of once — and it wasn’t until after the fact that I realized it might be a good idea. So, treat the second option as something to consider, not something that has been thoroughly tested.

[Read more…]

Cold Weather Tips (Repost)

892773_4643928691471_643100188_o

Guess why I’m reposting this?


Winter is here (in the Northern Hemisphere), and homebrewers living in colder climes may encounter situations in which cold weather affects their fermentations. When most homebrewers think of controlling fermentation temperature, they think of modified chest freezers or fridges to cool their brews. (Lacking that, the wet t-shirt method may be employed.) However, in cold-weather locations, fermentations may cool down to the point where they become sluggish or even stop. Here are some tips for keeping your fermentation temperatures up (and somewhat level) during cold weather.

[Read more…]

Why Partial Mash? (Mashing vs. Steeping)

IMG_1871

Partial mashing is a great compromise method between extract and all-grain.

I’m a big fan of partial mashing. For all-grain brewers who usually brew outside, it allows you to get out of the elements during inclement weather and brew in your kitchen. For extract brewers, there are a host of benefits.

Adding base malts to your extract recipes increases the aroma of base malt, which is sometimes lacking in malt extracts. And, it allows you to use the many different kinds of base malts out there and base malts made by different maltsters. More ingredients to choose from gives you the opportunity to more finely tweak the flavor of your beers.

A partial mash also allows you brew a lighter-colored beer, compared to the extract-plus-steeping-grains method, if you want to. In addition, if you’re trying to make a dry beer, you can use the enzymes from the partial mash to raise the fermentability of your wort. Finally, you can add small amounts of starchy adjuncts to your beer, without having it turn hazy. Starchy adjuncts include flaked (or torrified) unmalted grains such as flaked maize, flaked barley, flaked wheat, torrified wheat, rolled oats, etc. [The weight of the starchy adjuncts should be 30% or less of the total weight of the grains, excluding any malt extract, and paired with a lightly-kilned base malt with plenty of diastatic power (enzymes to convert starches) such as US 2-row pale malt or US 6-row pale malt.]

A small partial mash can be accomplished almost exactly as you would brew an extract recipe with steeping grains. The only procedural difference is you need to watch the temperature more closely and not “steep” the grains in too much water. It’s hard to think of any drawbacks to the method, although you might generate slightly more break material in your brewpot.

[Read more…]

Useful Brewing Calculations

Screen Shot 2014-01-05 at 6.09.30 PM

These days, most homebrewers use recipe formulation software to calculate their original gravity(OG), bitterness (in IBUs), and beer color (in SRM) from their list of ingredients. Likewise, the final gravity (FG) and alcohol content (usually ABV) is also calculated, based on the apparent attenuation of the yeast. In addition, extract efficiency is either calculated or can be identified by trial and error (changing the extract efficiency in the program until it predicts your actual OG). However, there are some additional equations that may help out the average homebrewer. Some of these appear in some software packages. If your brewing software doesn’t do these calculations for you, the easiest way to use them is to make a spreadsheet of the equations you use most often.

In two recent articles, I described the data you should collect when you brew. These are the equations that use those measurements.

[Read more…]

This Week’s Beer News

This was definitely the week for 2013 reviews, and Parade magazine gave what they felt were the weirdest beer stories of 2013. In Oregon, a former biochemist opens a brewpub with a science theme. In Egypt, archaeologists open the tomb of the brewer to Amenhotep III. The history of brewing is documented at San Diego’s Museum of Man. When Starbucks sent a cease and desist letter to a small brewpub (Missouri’s Exit 6 Brewery), they probably didn’t expect this funny response.  The beer world is clogged with beer review blogs, but I’ll bet few are as cranky as the one written by this guy, who doesn’t like Kickstarter-funded brewing projects.  And finally, Sierra Nevada released a time-lapse video of the fermentation of 2013’s Bigfoot Barleywine, to the strains of “In the Hall of the Mountain King,” by Edvard Grieg.

Measurements to Record: II

This is the second part of a two-part series on measurements to record on brew day


photoOne piece of equipment that almost every homebrewer has is a hydrometer. In addition, many have a pH meter (or at least pH papers). Both of these tools can give you valuable information on brewday.

[Read more…]

Imperial Tripel (Recipe Stage)

IMG_2108

What this tripel might look like, if all goes well.

This is a beer I plan to brew for the first time in 2014. I plan to brew it, taste the beer, tweak it and rebrew — and of course document this process on Beer and Wine Journal. The idea behind this beer is to take a Belgian-style Tripel, and crank it up a notch or two. I want to brew a pale beer, with a final gravity low enough not to be too sweet or be overly full-bodied. I plan to use reiterated mashing to generate the wort, because this will minimize the color. I also plan to hop it at a higher rate than a tripel, to compensate for the added strength. I’ll brew the beer in a couple weeks, but for now, here’s the recipe.

By the way, the name is just a Star Wars reference. (They can’t all be winners.)


Palpatine’s Tripel

(imperial tripel)

by Chris Colby


DESCRIPTION

A higher-gravity version of a Belgian tripel or Belgian golden ale, with added hop flavor and aroma. This beer is designed to be as light in color as possible (around 6 SRM), while still being 13% ABV. As with regular tripels, the beer has a low final gravity, given its alcoholic strength.

[Read more…]