5 Winemaking Rules for Making Great Homemade Wine

Making wine at home is a relatively inexpensive, stress-relieving hobby (most of the time!) that everyone should try. If you love wine, it’s a great way to save money on your hobby and a chance to get creative and make the wine you’ve always dreamt of! You can be obsessively detailed with every aspect if you want (and commercial winemakers are) but you really don’t need to be to enjoy good wine at the end. In this article, I explain five simple rules that should be followed on your winemaking journey.

1. Be Obsessively Clean

Wine spoilage is a real threat and one that you can help avoid by keeping high standards when it comes to wine hygiene. From the grape crush to bottling, you need to keep your wits about you and stay clean at all times. That means any winemaking tools or apparatus that come into contact with your wine need to be sanitized. That means your hands and arms and your arms too! Pretend you’re the surgeon and the wine is your patient! So what does this mean? Give your equipment a brush with hot water first to remove dirt and grime first. 

Once visible dirt and grime have been removed you need to use an approved sanitizing agent. A combination of dilute metabisulfite and citric acid is commonly used but I recommend avoiding using sulfites at every clean as you need to thoroughly rinse it off with sanitary (boiled) water to prevent residual sulfites from affecting the balance of your wine. I recommend using a solution like StarSan (commonly used in brewing) which is an acid-based biodegradable sanitizer. Don’t use anything too abrasive to clean with as it will scratch your equipment and provide easy hiding places for bacteria. You should clean equipment as soon as it’s been used to prevent dirt and grime from binding to your equipment.

2. Use The Right Yeast

There are many different types of yeast available for use in winemaking. Be sure to choose a yeast that is suitable for the type of wine you are making. Different yeast will produce different flavors in your wine, and to a large extent will influence the sensory qualities of your wine. Furthermore, using the right yeast will reduce the likelihood of there being problems with the fermentation. When choosing a wine yeast you want to match it to the grape varietal being used. The yeast will complement the specific properties of the grape and allow it to express its maximum sensory potential. You should also consider the alcohol content of the wine you wish to make. Some strains of alcohol have a lower alcohol tolerance and you may find the fermentation becomes stuck because the conditions become unsuitable for them.

3. Monitor Your Fermentation Temperature 

Fermentation is a crucial step in winemaking, and the temperature of your fermenting wine is very important. Too high of a fermentation temperature can produce off-flavors in your wine, while too low of a temperature can slow down or stop fermentation altogether. Be sure to monitor the temperature of your fermenting wine carefully and adjust as needed to keep it within the ideal range for the type of yeast you are using. As well as keeping track of the temperature, don’t forget to chart the progress of the fermentation with your hydrometer too. You can read more about hydrometers in winemaking with Tim Edison’s guide at Wine Turtle.

4. Don’t Stir Too Much 

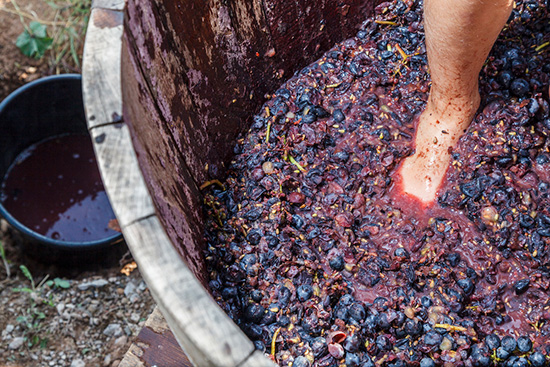
With red wine, stirring is important in the first 24 hours or so because it helps the yeast to do its job by oxygenating the must (the crushed grapes). However, you want to limit how much you interfere with your wine must once fermentation is in full flow. Punching down the cap with red wine (the floating pulp) regularly is really important to stop bacteria from growing on it, but it doesn’t need much of a stir.

With white wine, a gentle stir every 24 hours during fermentation should suffice. The reason for this is to release the volatile sulfur compounds that are created. One of these compounds is hydrogen sulfide which can make your wine smell like rotten eggs!

5. Age Your Wine Properly 

Your wine will benefit massively from some aging. This is often the hardest part because it takes some patience and self-control not to drink it. However, you’ll thank yourself in the long run. Aging the wine allows flavors and aromas to develop and mature. It rounds off the sharp, abrasive notes and helps round off the tannins too.

After being bottled your homemade wine needs at least four weeks to age but to be honest you should age it for a lot longer. I’d be more inclined to age red wine for at least 6 months. Whites, on the other hand, don’t benefit so much from age and can be drunk while young. Just make sure you have a place that’s reasonably cool and dark to store your bottles.

Above all remember to have fun! There’s an awesome winemaking community out there full of great people who are more than willing to help out beginners with all the questions we all have. Make sure to set up a profile on one of the many online forums or join a local group in your area. It’ll make the process all the easier and more enjoyable.

[This article is a paid guest column and as such is labelled as an advertisement.]

Fruit Wine, Take Two

IMG_3524

The fruit, in a nylon bag, fermenting in a bucket. Every day, the fruit gets punched down, so all of it contacts the fermenting wine over the course of the fermentation.

OK, since the website name is Beer & Wine Journal, I guess I should occasionally post something about wine. Back in 2013, I made a wine I called Cherry Berry Wine because it was made with . . . well, you guess (or see the recipe). Last week, I was shopping at HEB (my local supermarket) and they had the same mix of fruits for fairly low prices, so I got the ingredients for another batch of fruit wine. [Read more…]

Quick Spiced Holiday Mead

IMG_1919

This guest article originated with a listener’s question to Basic Brewing Radio. James asked mead fan Tim Leber to respond to a question involving the desire to make a mead in time for the holidays. Tim’s answer was so thorough that James suggested that Tim flesh it out and let us publish it. So here’s Tim’s suggestion for making a spiced holiday mead in time for the holidays. He recommends de-gassing the mead during fermentation, to keep the yeast working as quickly as possible. And, when primary fermentation is finished, the mead is stabilized with potassium sorbate (which is commonly used in winemaking).

[Read more…]

Making Wine from Juice: Intro

wine

Making wine from juice allows beginning winemakers to make their wine without purchasing expensive equipment.

Longtime homebrewers may, at some point, wish to branch out a bit. Many eventually add mead, cider or both to the list of fermented beverages they produce. And of course, wine is also a popular option.

Homebrewers can introduce themselves to winemaking by trying kit wines. Kit wines contain everything you need to make wine in one box, presuming you have a bucket fermenter and all the usual equipment (hydrometer, tubing, etc.) The best kits are simple to make and the resulting wine can be excellent if you follow the directions closely. However, the simplicity and “by the numbers” approach of kit wines may not be attractive to homebrewers who wish to make wine “from scratch.” Unfortunately, making wine from grapes requires some reasonably expensive (and fairly large) pieces of equipment and this can discourage some from trying it.

For homebrewers who’d like to try winemaking without having to buy a lot of equipment, but still retain the freedom of making wine from raw ingredients (or nearly so), there is frozen grape juice. There are companies that crush quality wine grapes from vineyards in wine growing regions and freeze the resulting juice. This can be used by home winemakers to make high quality wine.


Overview of How Wine in Made

In order to introduce the topic of making wine from juice, I’ll review how wine is usually made. Winemaking starts in the vineyard where wine grapes are grown. Most wines you would buy are made from grapes of the species Vitis vinifera, and these include Cabernet Sauvignon, Pinot Noir, Merlot, Chardonnay and Riesling.

[Read more…]

Fruit Composition Table

To help brewers and winemakers formulate their fruit beers and country wines, here’s a table listing the percentage of water, sugar and acid found in many common fruits. The types of acids in the fruit are also listed.

[Read more…]

Tweaking a Wine Kit

IMG_1291

A modern wine kit. (Photo by Rich Weaver.)

As Rich Weaver points out in a previous article, wine kits are a great way to start exploring winemaking — especially if you are already a homebrewer and have much of the equipment you need in your brewery. However, many homebrewers may chafe at having to follow the instructions and wish to experiment with their wine kit. This is great, but there are a couple things you should know before doing so.

A wine kit is designed to be reasonably foolproof and to deliver a quality wine under the reasonable amount of variation that would be expected when winemakers of various experience levels make them. In addition, wine kits are designed to ferment and mature quickly, be bottled young and be ready to drink in a short amount of time. That amount of time varies, depending on the kit, but 4–6 weeks is a common timeframe. Given that knowledge, here are few things you can try to tweak your kit wine.

[Read more…]

First Racking of Fruit Wine

DSCN0656

A wine aging in a secondary fermenter. (Photo courtesy Rich Weaver.)

My cherry berry wine has been in the primary fermenter for 11 days. It’s been 4 days since any significant activity was seen in the airlock and I think it’s time to rack it to secondary. Most country wines don’t benefit from spending much time on the lees — the winemaking term for the yeast sediment at the bottom of the fermenter. In beer, we’d call it trub.

The day I made the wine, I added 1 Campden tablet per gallon (3.8 L) to the must (the unfermented wine). This should have added 66 ppm sulfur dioxide (SO2) to the must, initially. When you add potassium metabisulfite (the active ingredient in Campden tablets), it releases some sulfur dioxide SOgas, the so-called free SO2. The rest of it remains dissolved, in one form or another, in the must. The percentage of the metabisulfite you add that ends up being released as free SO2 depends on the pH of the wine. The lower the pH, the less metabisulfite is needed to protect the wine. I didn’t take my initial must pH, so I don’t know what percentage of the 66 ppm SO2 existed as free SO2.

Sulfur dioxide at around my initial concentration serves two purposes — it kills microorganisms in the must (because wine musts are not boiled as beer worts are) and it protects the wine from oxidation. The next day, the level of SO2 is supposed to drop low enough that you can safely pitch your wine yeast. This must have happened because I added the yeast that next day and fermentation was in full swing within 24 hours. (I wasn’t watching it like a hawk, so I don’t know exactly when the airlock started gurgling.)

[Read more…]

Cherry Berry Wine

IMG_1808

The fruits I used in my wine. (I also used frozen grape concentrate.) They look tasty, huh?

Walking through my supermarket produce aisle, I frequently think, “I could ferment that” about various fruits and vegetables. This weekend, my supermarket was having a sale on strawberries, cherries and blueberries and I changed my thinking from “I could ferment that” to “I will ferment that.”

Recently, I posted an article on why most wines are made from grapes. The gist of the article was that grapes have everything you need to make good wine. However, you can make wine from other fruits if you just make up for any deficiencies. So, upon seeing the fruit sale, I loaded up on strawberries, cherries and blueberries, but also got some raspberries and a can of frozen white grape concentrate to round things out. When I got home, I looked around at country wine recipes and decided on the proportions of the fruit and last night, I made the wine.

I’m posting the recipe now and will give updates as the wine ages. (I actually used tartaric acid instead of a wine acid blend, but I put the latter in the ingredient list because I think it’s a better choice.)

[Read more…]

Why Grapes?

Vitis-vinifera-2

Most wine is made from grapes. If you are attempting to make wine from fruit other than grapes, it pays to understand why this is. (Photo from Wikipedia.)

You’ve probably noticed that most wine is made from grapes. If you go to the liquor store, you may be able to find a few wines made from other fruits (so-called country wines), but these are a small minority. The vast majority of wines are made from grapes. And not just any grapes —  most wines are made from grapes of the species Vitis vinifera.

With summer here and many fruit harvests to come, some homebrewers may be wondering if they can make homemade wine from the bounty of their local orchards or gardens. You can, but before trying to make wine from fruit, it pays to understand why most wine is made from grapes. In a nutshell, grapes contain the right balance of sugars, acids and tannins to make a fermented beverage that will keep and also taste good.

On their own, most other fruits do not. However, you can add sugar, acid or tannins to balance the juice from any fruit and ferment it into a delicious fruit wine. Over the summer, I’ll explain how to make fruit wine from a few of the more popular fruits. But first, let’s take a look at grapes and what makes them the fruit of choice for most winemakers.

[Read more…]

Why Make Wine Kits?

IMG_1291

A modern premium wine kit, containing a bag of slightly concentrated grape juice (in the box) and all the additives in individual containers. This kit also contains grape skins which the winemaker soaks (macerates, in winemaking lingo) during the fermentation.

Article and photos by Rich Weaver

Imagine going to your favorite wine shop and paying $20 for your treasured British Columbia Meritage. You pour the wine and take in its aromas of vanilla, chocolate, and leather. You swirl the wine over your tongue and detect flavors of plum and black currants. Now, what if you could make that same wine for $5 a bottle?


Why Make Wine From Wine Kits?

There are several reasons why to make wine from wine kits.  One reason is that you love wine and want a cellar with a nice selection of wine without breaking the bank. The equipment needed to make wine from a kit runs in the $100 to $200 range. And if you’re a homebrewer, you probably have most of it anyway. From there, you can always purchase more carboys to increase your capacity to make more wine to meet demand. Kits themselves vary from “budget” kits, starting at around $60, to premium kits that cost up to around $200. A kit makes 6 gallons (23 L) and yields 30 bottles of wine, so your wine will actually cost around $3 to $7, depending.

[Read more…]