First Adult Monarch Butterflies Emerge

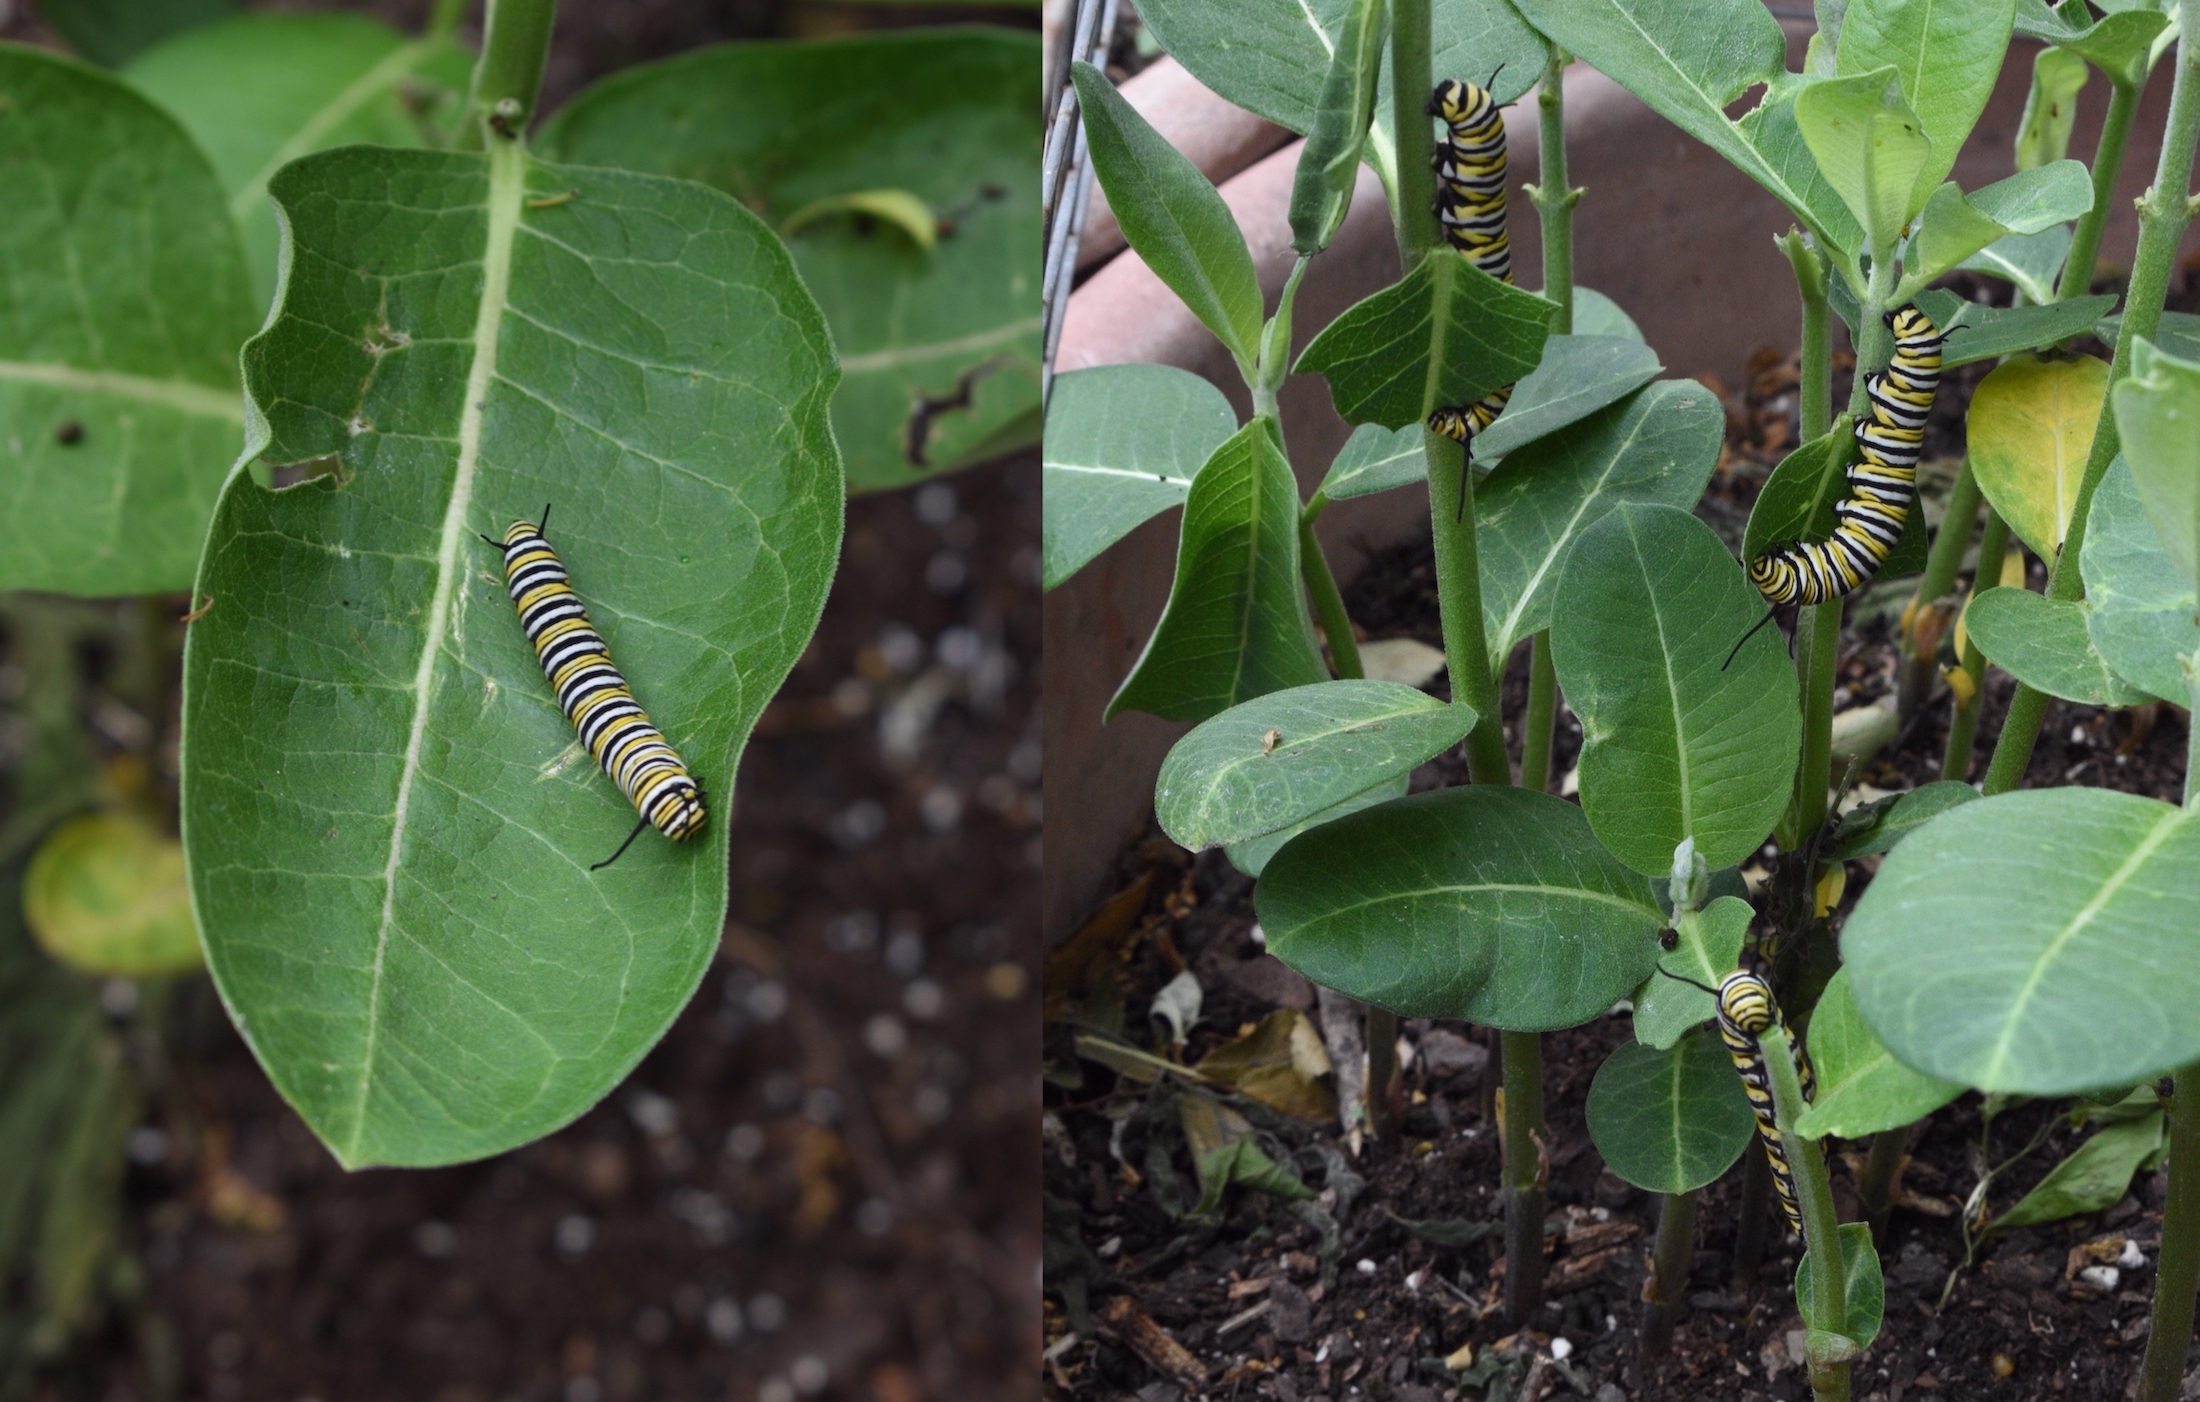
This past week, May 2nd through May 8th, my first adult monarch butterflies emerged from their chrysalises. The eggs had been laid in early April. The larvae developed through 5 caterpillar stages, called instars, through the middle of April. The caterpillars then formed a chrysalis and hung for about 10 days. As you might recall, I was hoping to raise and release 240 monarchs this spring. This week, I released 36.


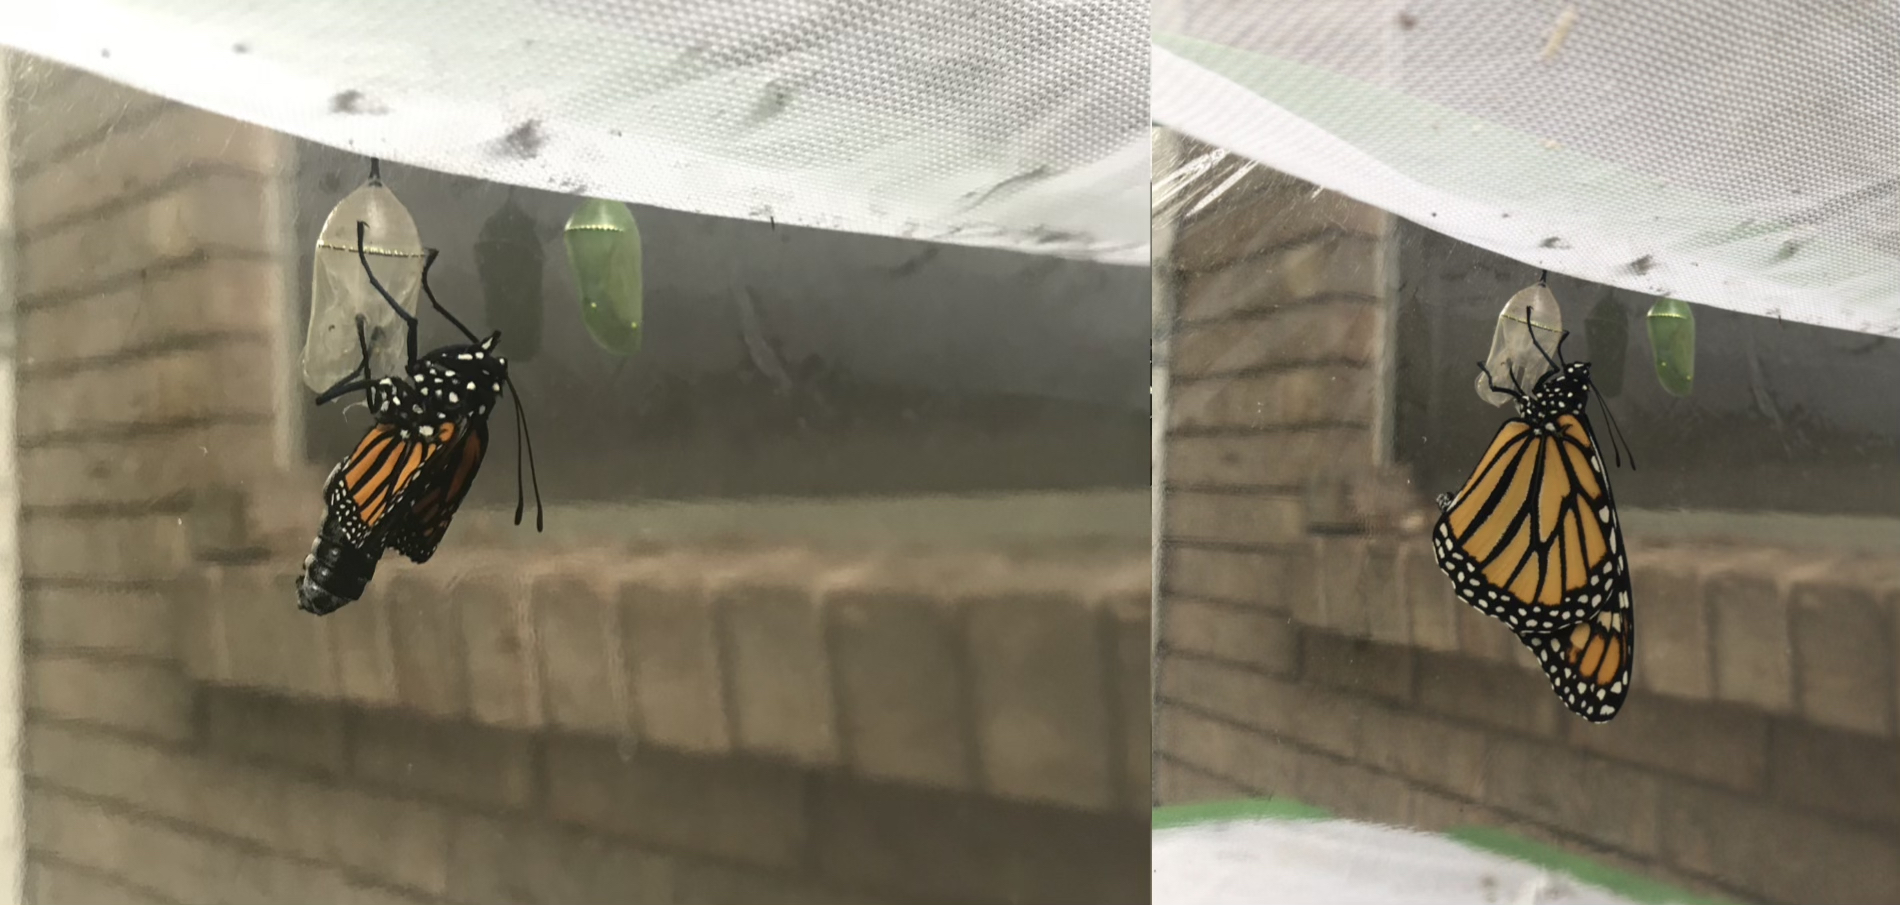
A monarch butterfly immediately after emerging from its chrysalis, then a minute or so later when it had most inflated its wings. You can see the distended, fluid-filled abdomen in the first pic. The butterfly rhythmically squeezes the liquid from this into the veins on its wings to inflate them.


If I could release 36 more each week for the next 6 weeks, I would hit my goal. Unfortunately, after the first few female monarchs laid eggs in my garden, I quit getting visits. As I detailed in this post, our weather was cold and additionally the number of monarchs this year are down. I did have another female visit this past weekend, so I should have caterpillars from her soon. However, I have yet to see any.


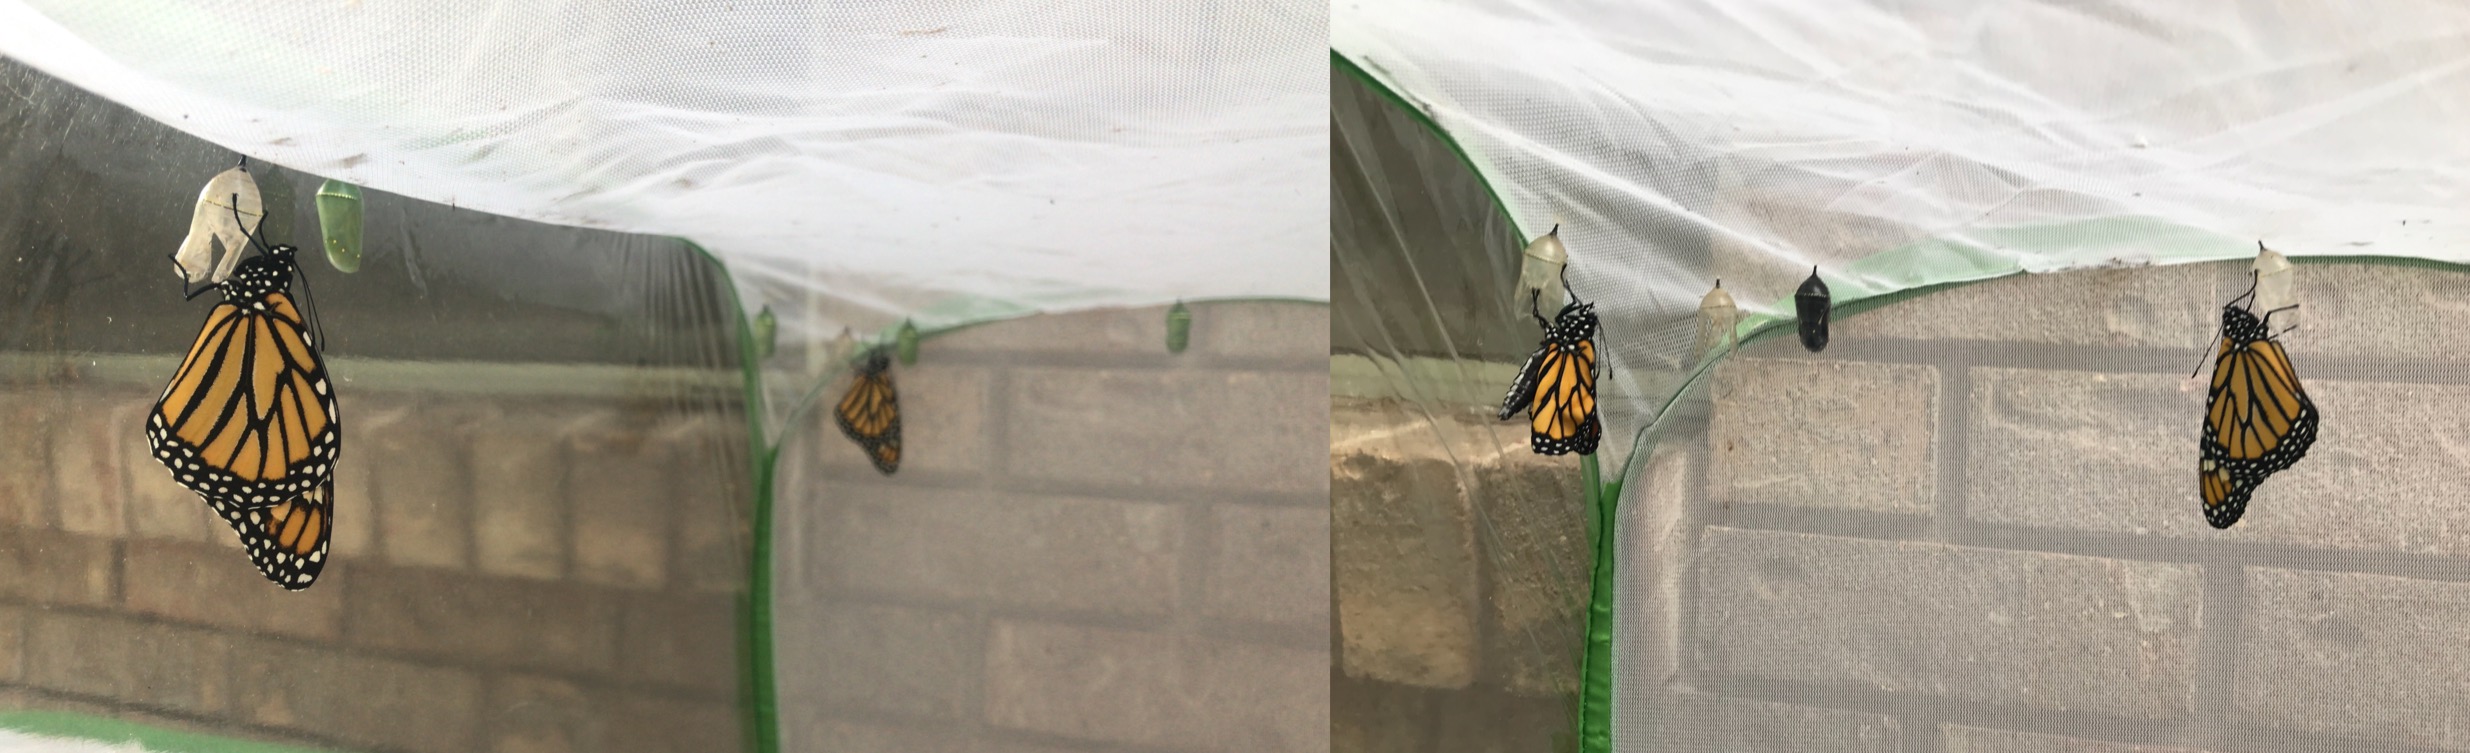
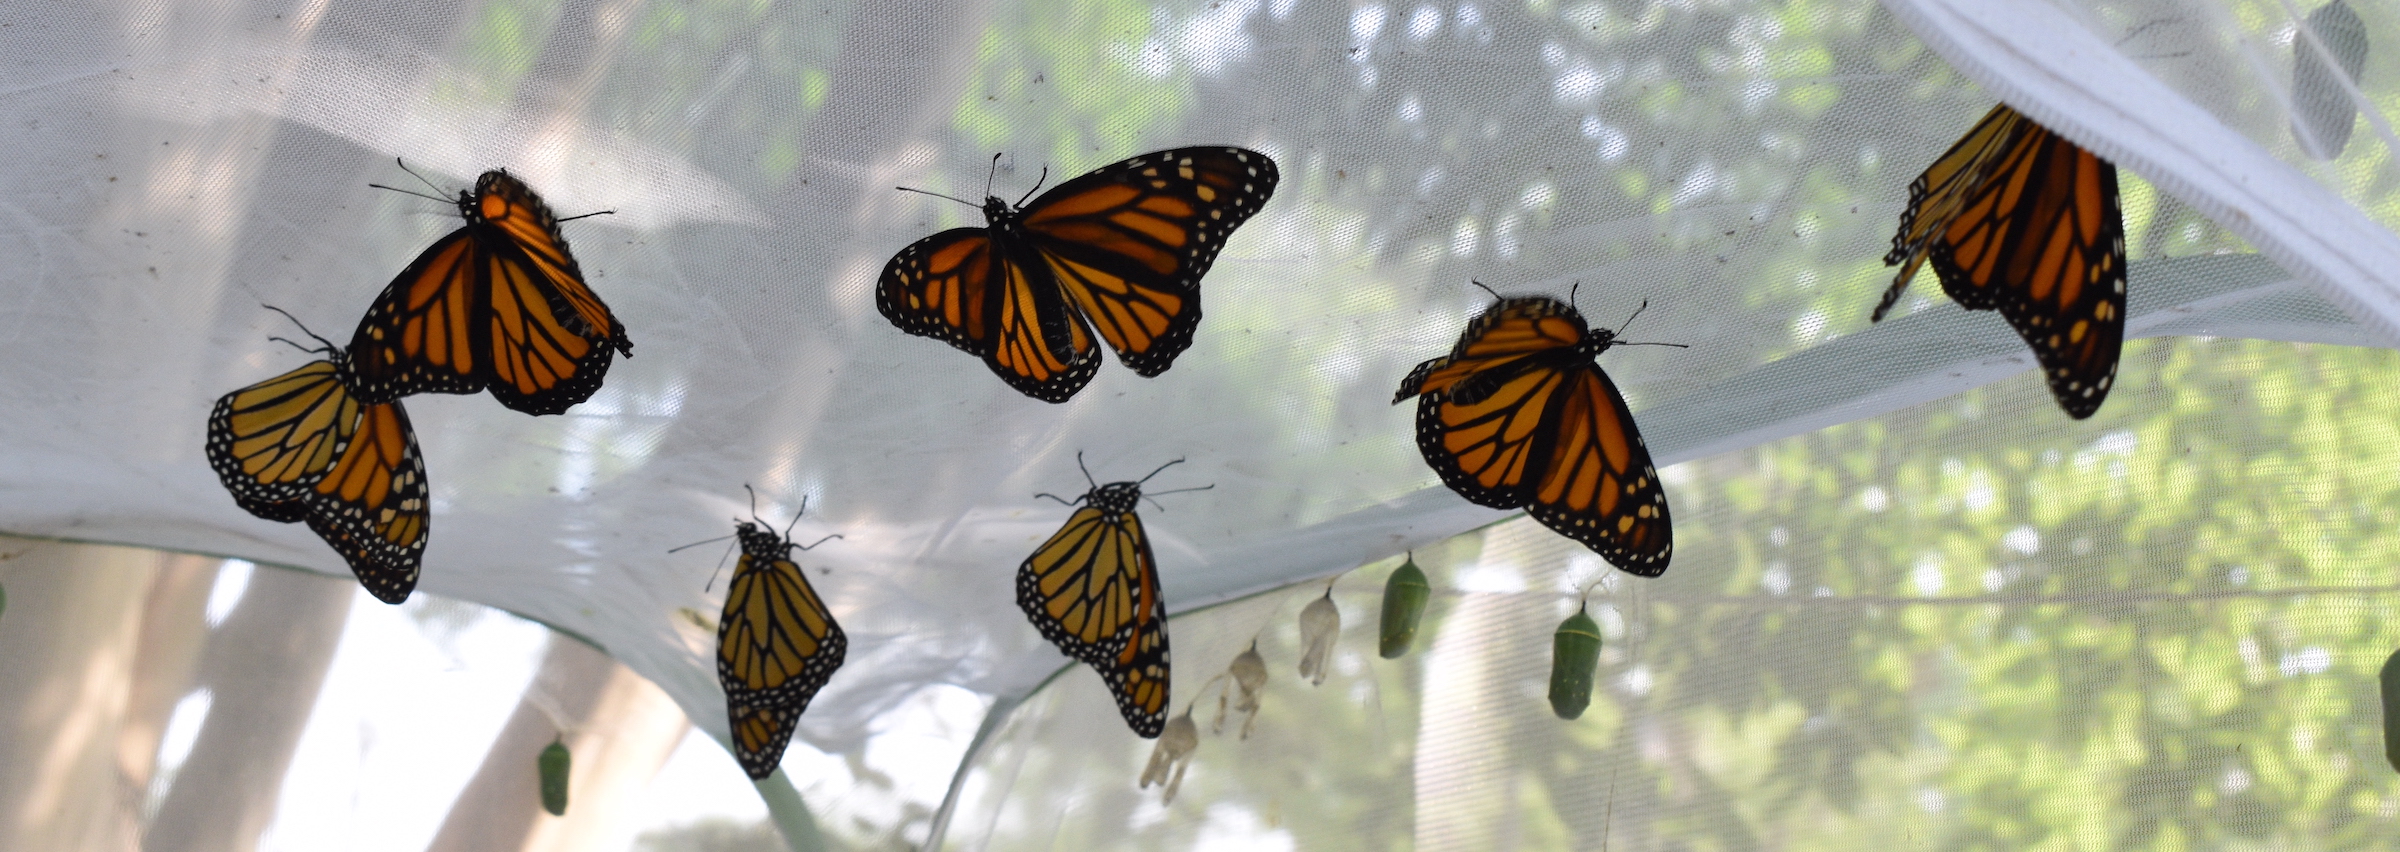
Butterflies hanging in my enclosure. After emerging from their chrysalises — or eclosing, in the lingo — the monarchs must let their wings dry before they can fly. Their wings are too heavy when they are still wet.


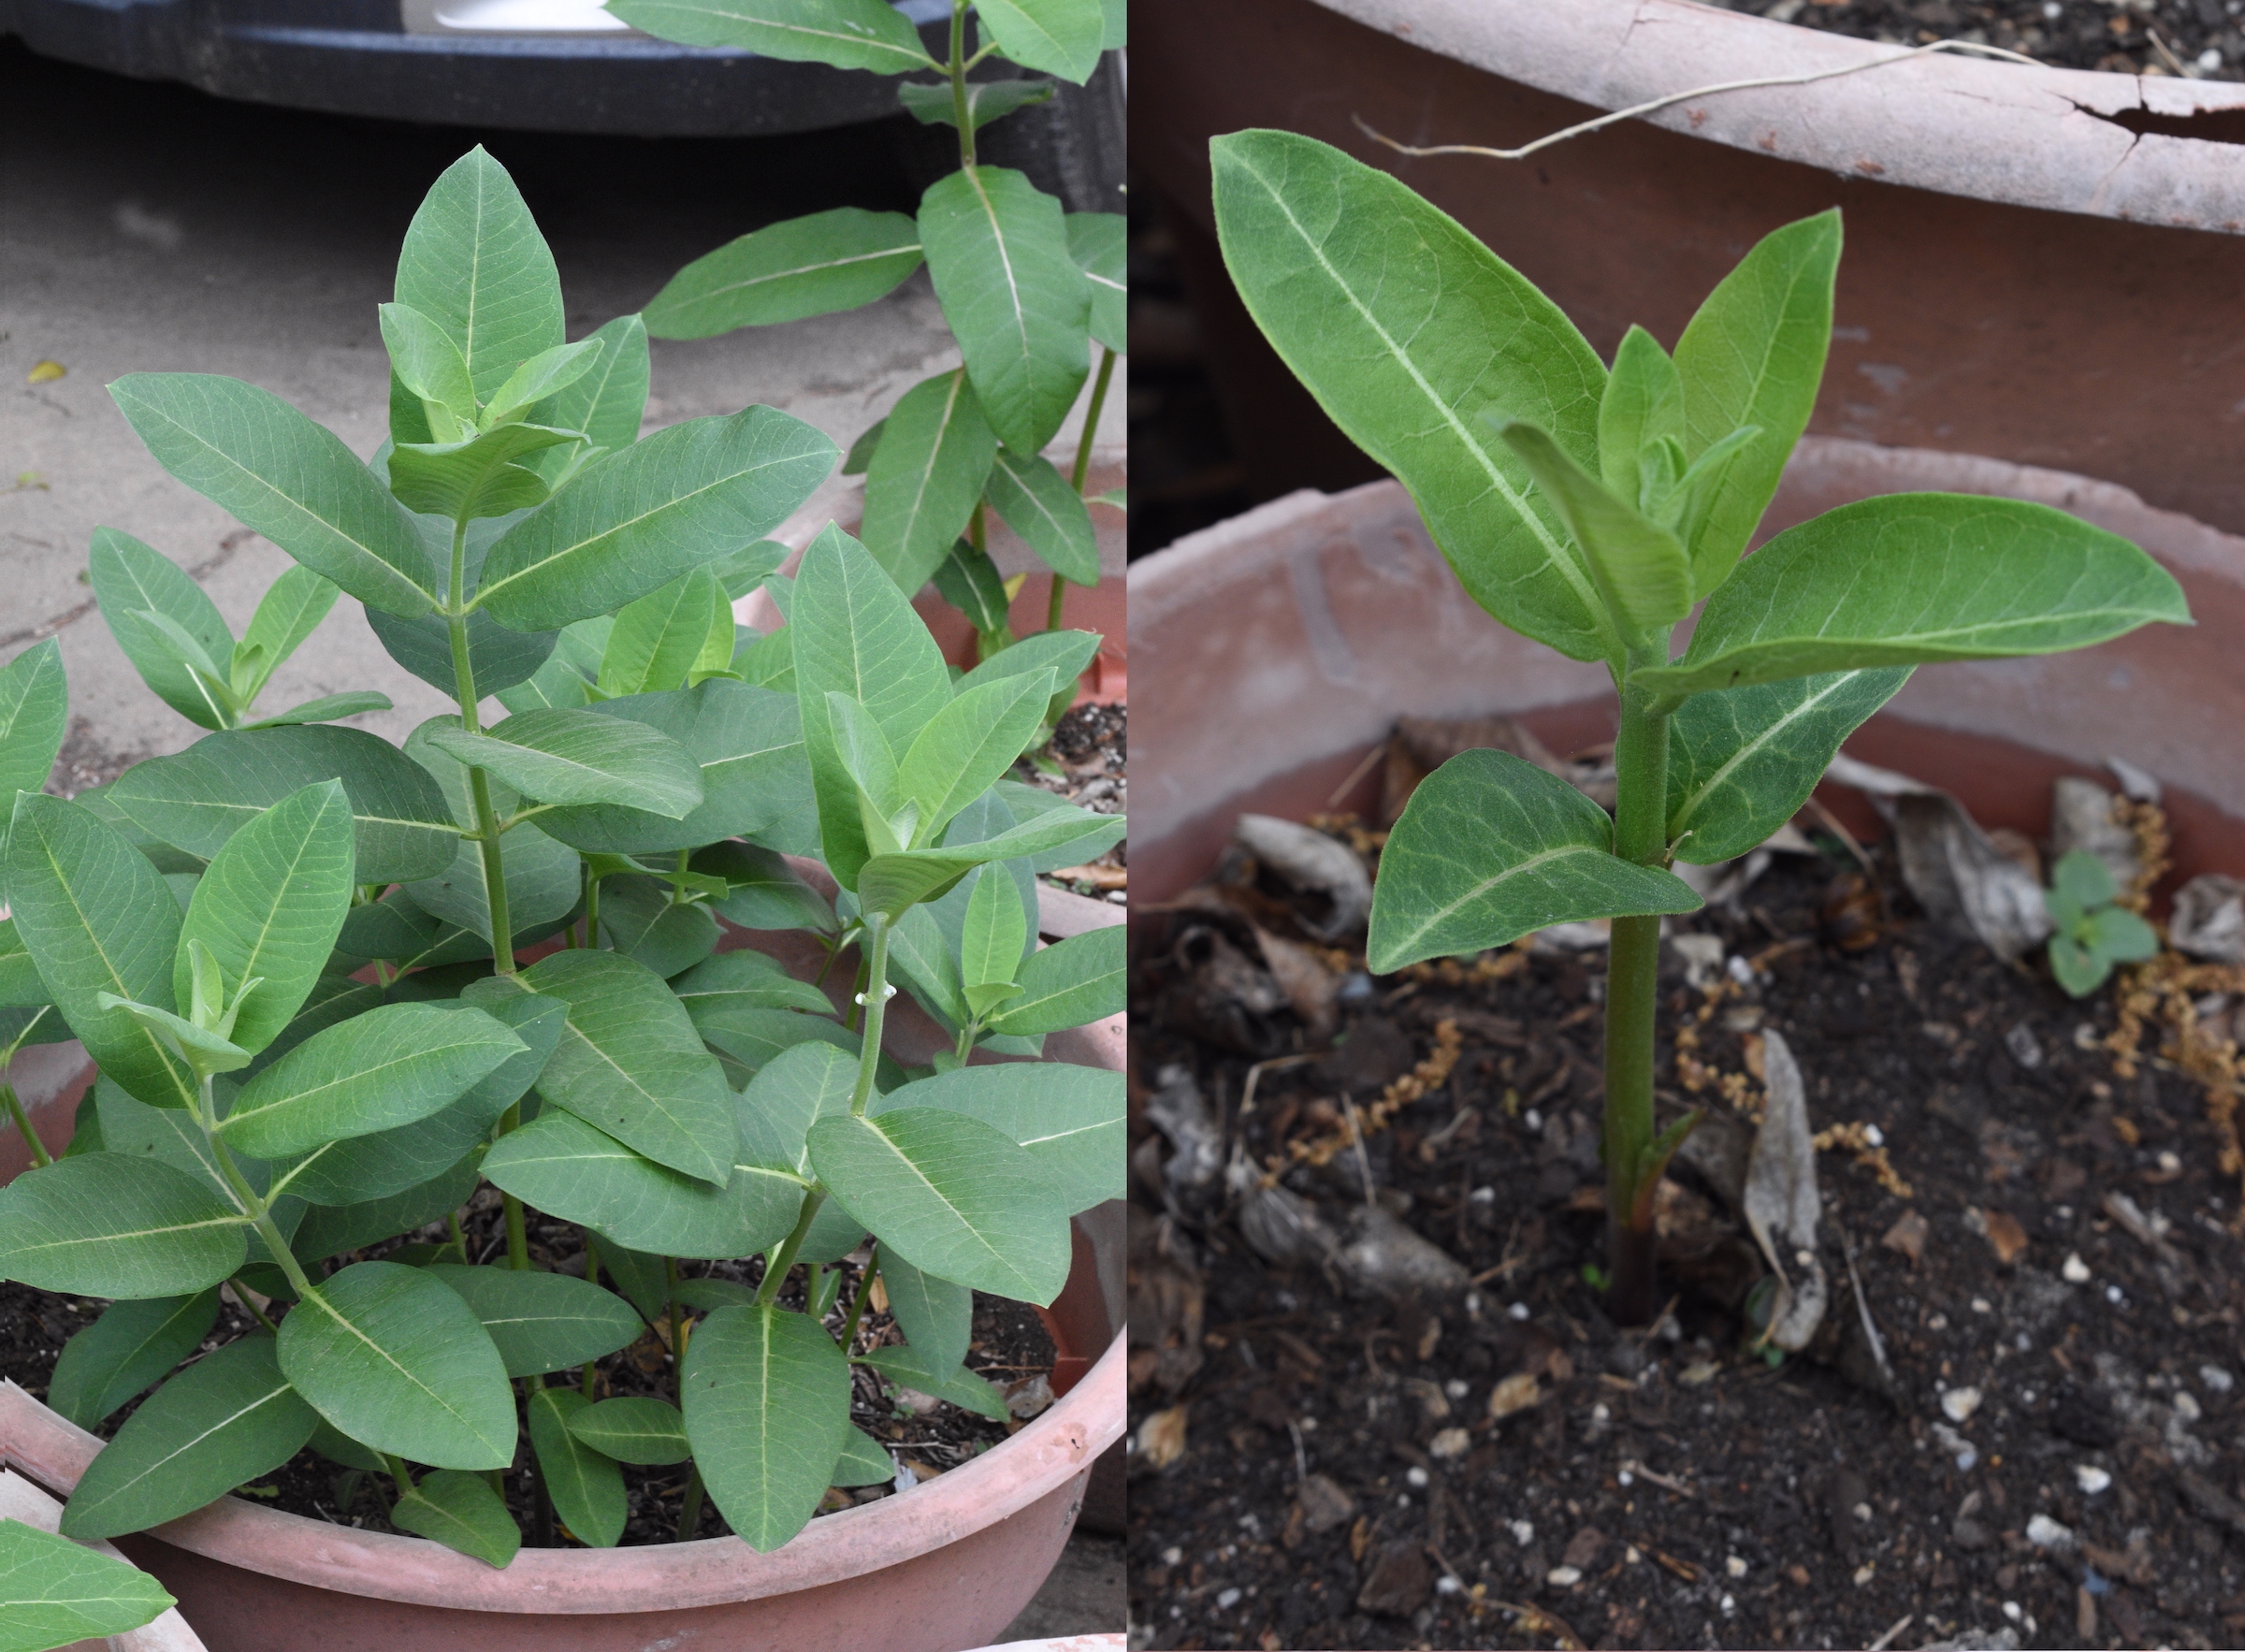
In Central Texas, “monarch season” usually lasts from early April through mid-June, so I still have time. And the garden is in great shape — lots of milkweeds and plenty of other native perennials blooming. But, the clock is ticking.

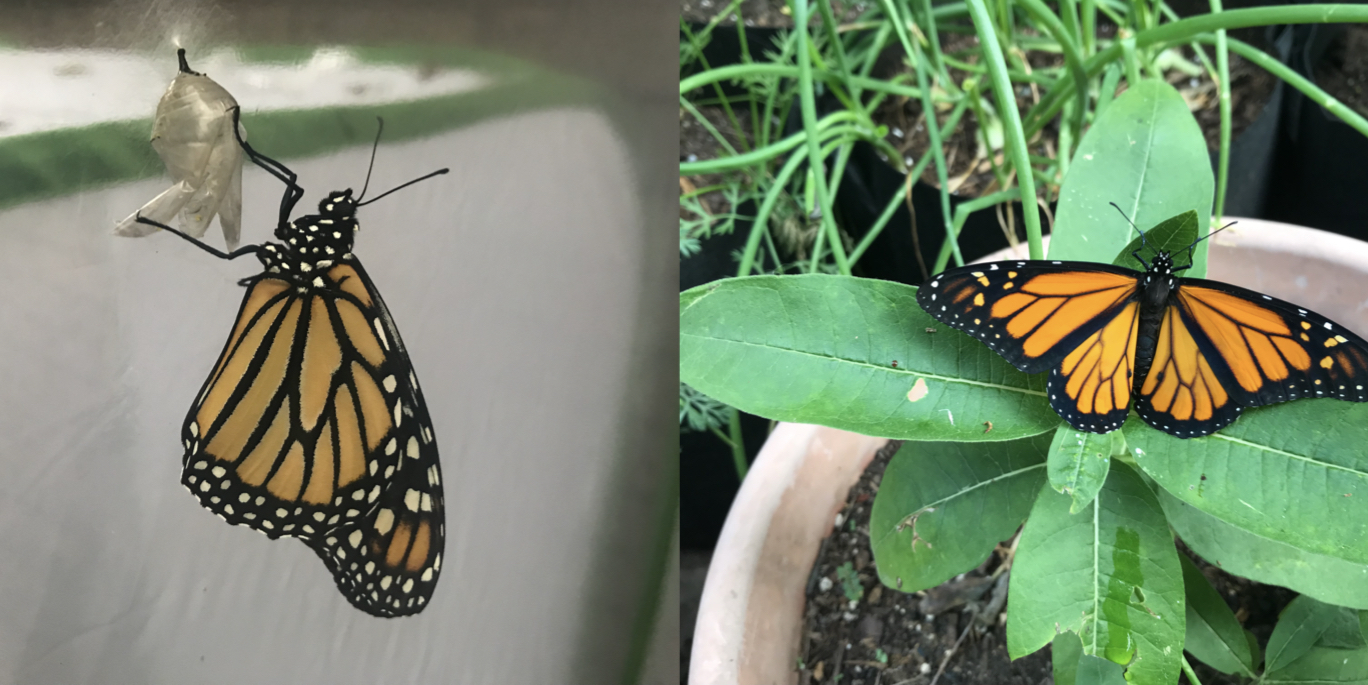
Two of the 36 monarch butterflies I released. Note how vivid the colors are on the upper wing just after eclosing. This coloration fades over time.


Monarch Project Off To Slow Start

I am hoping to raise and release 240 monarch butterflies this year. However, my project is off to a slow start. My garden received a few visits from female monarchs in late March, but none that I have seen since. The weather has been unusually cool and additionally, monarch numbers are down this year. So, either one of those factors, or both, could be to blame. I have plenty of milkweeds in my garden and more blooming flowers than I have ever had. But I need gravid females to visit the garden.

I have two butterfly enclosures (left) that I place milkweed plants in. The caterpillars I capture are placed on those plants. Three of my 20+ monarch butterfly chrysalises (right) currently developing.

I currently have over 20 chrysalises in my enclosures, but few caterpillars to back them up. I need a fresh wave of eggs and subsequently caterpillars. Of course, every year the arrival of monarchs is episodic. And good weather in May — and a bit of good luck — could turn everything around. The spring monarch migration through Texas is still in its early stages. However, this is a disappointing start.

Choosing Tomato Transplants

You can start tomatoes from seeds, but many gardeners buy seedlings (or transplants) in the spring. Choosing the best transplants will result in tomatoes that rebound quickly from being transplanted, grow vigorously, and yield the best crop. Fortunately, choosing the right transplants is straightforward. Except for one thing, all of the criteria for choosing the best transplants are fairly obvious. 

When looking through tomato transplants at a nursery, your first goal should be to identify the healthiest plants. Yellow leaves, which can often be found among the lowest leaves on the plant, indicate a lack of nitrogen. A purple cast, especially around the edges of leaves, is likely to be a phosphorus deficiency. This is less common than a nitrogen deficiency. Tomato seedlings should be a moderate to dark green — but not blue green, as that is evidence of too much nitrogen. And, obviously, they should not be wilted. Wilting could be due to a lack of water — in which case it is easily solved — but it could also be a sign of more serious problems. Young tomatoes — transplanted into well-drained, fertile soil — can quickly overcome early nutrient or water deficiencies, especially if they are minor. However, it’s best to start with the healthiest plant possible. 

Yellow leaves, most often seen near the bottom of transplants, are a sign of a nutritional deficiency. Deformed leaves may be the result of disease. Transplants can quickly overcome mild nutritional deficits.

When looking at transplants, also look for holes in the leaves, which may be indicative of an insect infestation. The leaf damage in and of itself is not particularly worrisome. However, some insects — such as white flies — carry diseases that can manifest themselves when the plant is larger. Also look for leaves that are curled, blotchy, or malformed, as this may be the fist signs of disease. Avoid these plants. 

The final thing to look for in a tomato transplant may seem counter-intuitive — look for the smaller transplants (among plants in same-sized containers). Tomatoes are often sold in tiny 4-well flats, 4″ planters, or in small cups that hold a little more soil. Much of the time, nursery transplants have overgrown their planter by the time they are on display. They can look healthy, but they are rootbound. Nurseries offer these transplants because people want to buy large plants. They think they are getting ahead that way. If there is a table of tomato transplants at a nursery, you almost always see people crowded around the largest plants.

Sometimes, the plants for sale already have flowers. And people obviously like to buy them, apparently because they think they will have tomatoes soon. However, early flowering is not desirable as it is indicative of the plant having switched from rapid growth to an attempt at reproduction. You may get tomatoes fairly quickly, but they will likely be small and the rest of your crop with not be very abundant. 

When you take overgrown transplants out of their container, the roots will be a tangled mess, pressed against the sides of the container. The above ground foliage can look healthy. However, once planted it will take time for a rootbound to acclimate. They will be slow to start vigorous growth. Rootbound tomatoes will rebound with time, but you are better off starting with smaller transplants. These will quickly start growing vigorously and — if you plant at the right time — be the right size when it it is time to flower and set fruit. 

This plant is roughly twice as tall as its container. Its roots have grown to the sides of the planter, but are not excessively tangled or knotted. It should quickly rebound and resume vigorous growth when planted.

A reasonable rule of thumb is that the transplant should be less than three times as tall as the container it is growing in. Optimally, I think that when a plant is twice the height of its container, it is fairly large, but small enough that it will acclimate quickly when planted. Because it is not rootbound, it was likely growing quickly inside its container. And it will continue this vigorous growth‚ after a very brief period of acclimation — when put in the ground.

That’s really all there is to choosing transplants. Pick a healthy, green plant — one that is small enough that it is still growing rapidly in its container — and you are off to a great start.

First Monarch Caterpillars In My Garden

I’ve got caterpillars in my garden. The eggs from the first wave of female monarch butterflies started hatching a couple days ago. They took longer to hatch than usual, probably because the weather was a cooler than average in the days after they were laid. Finding monarch eggs on milkweed is fairly hard because they are small and usually on the underside of a leaf. Finding monarch larvae (caterpillars) is much easier — just look for a hole in the leaf. When a caterpillar hatches, the first two things it does are eat the egg casing then chew a small hole in the leaf. It will then expand the hole a bit before crawling off to start feeding in another location. It may do so to prevent other insects from finding it easily and eating it.

A hole on top of a milkweed leaf (left) and the same hole and caterpillar under the leaf (middle). A second example of a monarch caterpillar next to a hole in a leaf.

Monarch larvae develop through five stages, called instars, before forming a chrysalis. The caterpillars in the photo above are first instar caterpillars. The caterpillars below have molted once and are second instar larvae. Each successive instar is larger than the previous one and its coloration pattern is different. First through fourth instar caterpillars are most often found under leaves. They eat nearly constantly, except then they stop to molt.

These second instar larvae are feeding on butterfly milkweed seedlings.

So far, I have set up two butterfly enclosures on my driveway, near my milkweed plants. When I capture a caterpillar, place it on a butterfly milkweed seedling and place the seedling in the enclosure. I have collected over 30 now. Once they have eating most of these seedlings, I will transfer them to larger host plants. (I will put the seedlings back in the sun and they should recover fairly quickly.) My quest to raise and release 240 monarchs is off to a fast start, but there is still a long way to go. I should have chrysalises in a little over a week.

The Monarchs Have Arrived

On Saturday (March 25th), I saw my first monarch butterfly of the 2023 season. It was a washed-out looking female, indicating she had flown all the way from her overwintering spot in Mexico, not recently eclosed from a chrysalis. She flew around my garden for 40 minutes and laid at eggs on many plants. I found seven and there are likely more. In the next three days, I saw a monarch a day, including two more females laying eggs. As such, I could have caterpillars as soon as tomorrow (Wednesday, March 29). It usually takes 3–5 days for monarch eggs to hatch, with warmer temperatures leading to eggs hatching more quickly. I didn’t get a good picture of any of the adult butterflies, but I found and photographed several of their eggs.

Monarch eggs on milkweed

Both pictures are of a monarch egg under the leaf of a common milkweed plant. The egg is the small white “bump” near the center of the pic.

Females almost always lay their eggs underneath one of the uppermost leaves on the plant. They hang on to the edge of the leaf and curl their abdomen underneath to deposit the egg. The uppermost leaves are the most tender and this may be the reason females prefer those. Or, maybe they are easier to navigate to. Reputedly, a female can lay up to 300 hundred eggs in her lifetime. I’ve seen some females lay around 20 eggs in my garden in a single visit.

Monarch eggs on milkweed

Two monarch eggs laid on the same milkweed sprout (left). An unusual case of an egg being laid on top of a milkweed leaf.

So, my quest to raise 240 monarch this year in a garden in central Texas (USDA Zone 8B) is off to a great start. Follow this website to see how it goes.

Milkweed Rhizomes Are Sprouting

A week and a half ago, I planted 30 milkweed rhizomes. And I also have 33 milkweed rhizomes that overwintered in large planters. I now have sprouts from both types of rhizomes.

Normally, I don’t see any milkweeds emerge until mid-March. I’m guessing that the unusually warm spring we are experiencing has spurred them to arise earlier than usual. As in previous years, the first sprouts have come from smaller rhizomes and in smaller planters, which I assume have smaller rhizomes than the large planters. The milkweeds from larger rhizomes lag behind the smaller ones, initially. But they catch up and grow larger than them by early in the growing season.

Two milkweeds that sprouted from rhizomes on February 22nd.

I’m always amazed at how quickly milkweeds grow when they sprout from rhizomes. The rhizome is a thickened section of root that stores starch. That starch can be used for rapid growth in the early spring. In the wild this allows the milkweeds to — at least temporarily — be taller than the surrounding plants and thus have access to sunlight. Milkweeds grown some seeds grow more slowly, and need to sprout in a location where they aren’t immediately shaded by other plants. This difference in early growth makes sense because the milkweed seed has far less starch in it than the rhizome.

The same milkweeds as above, one week later.

I’m in USDA Zone 8B, so I would expect that gardeners in Zone 7 should see their milkweeds sprouting soon. Farther north than that, it is hard to predict as the northern part of the country is still in the midst of winter. Journey North — a website devoted to tracking monarchs and other organisms — shows that I am not alone in seeing milkweeds already.

If you have been following this site, you know that I’m growing these milkweeds in order to raise monarch butterflies. I will also need other flowering plants to attract the monarchs. Already, a few native perennials are flowering in or around my garden. These include spiderworts, baby blue eyes, and oxalis. And I already have flower bud on my gaillardia plants. I hope to raise 240 monarch butterflies this year,. And so far — with the emergence of some of the milkweeds — I’m off to a good start.

Spiderwort (left) and oxalis (right). Both are dependable early bloomers.


Planting Milkweed Rhizomes

I planted 30 milkweed rhizomes on Thursday (February 16th), a major step in my 2023 monarch butterfly raising project. Rhizomes are thickened underground stems that store starch for plants. Rhizomes can send down roots and send up stems. In the late fall, all of the above ground foliage on milkweed plants dies. The milkweed rhizomes then overwinter underground. In the spring, they provide the energy for the plant to sprout. Some types of milkweed also spread via their rhizomes. The underground stems grow horizontally and, over the years, the plant will form a clump with many above ground stems. 

In fall of 2022, I had 66 milkweed plants growing in planters of various volumes, from around 25 gallons down to small, 6” planters that only hold about a quart. I decided to leave the rhizomes in “large” planters — which I defined as 3 gallons or larger — in their potting soil. This is what I’ve done most years. 

Left: Milkweed rhizomes wrapped in damp paper towels and stored in a ziplock bag. Right: Milkweed rhizomes unwrapped and ready to be planted.

However, over the winter, I tipped out all of the small planters and fished out the rhizomes. There were 30 such containers. I wrapped the rhizomes in moist paper towels and put them in ziplock bags. The bags were kept in the refrigerator. I have done this successfully a few times in previous years, so I knew it would work. 

The reason I did this was to move the milkweeds to larger planters. Moving them as rhizomes, I believe, is better than waiting for them to sprout and moving them as growing plants. 

Left: Five-gallon planters holding the rhizomes. You can also see some of the 2-gallon planters on the right edge of this photo. Right: Three-gallon planters holding milkweed rhizomes.

The rhizomes themselves ranged in size. I planted the 6 largest in 5-gallon planters. I planted the next 5 largest in 3-gallon planers. The rest went into 2-gallon planters, so some may not have gotten a larger container. Most did, however, as some of my planters were quite small. 

Planting the rhizomes was easy, I just sunk a trowel into the potting soil and pushed some soil aside. I placed the rhizome vertically into the hole created by the trowel and then removed the trowel. If the top of the rhizome was sticking out of the soil, as it usually did, I added a little more potting mix to the top of the planter. 

The temperature inside the refrigerator was around 40 °F. The low temperatures Thursday and Friday night were in the low 30s °F. So the rhizomes got a final couple night’s worth of cold temperatures. Now, they will start to warm as the forecast calls for a lot of days in the 70s–80 °F and nights in the 50–60s °F coming up. If the last 10 years are any indication, the milkweeds should start sprouting in mid-March — right around the time of the average last frost. 

Soon, I will have milkweed plants.

My 2023 Monarch Raising Project (III: Disease)

[During the spring of this year, I hope to raise and release 240 monarchs. This is the third post in a series about my monarch butterfly raising project. The first post in this series dealt with growing milkweeds, the host plants for the monarch butterfly. The second post dealt with native flowers to attract the butterflies. This post is about dealing with the possibility of disease.]

In order to raise and release 240 monarchs butterflies, I will need to grow a large amount of milkweed in a fairly small space. I will also have too rear the butterflies in close quarters inside my butterfly enclosures. Anytime any species is found at a high density, the possibility for a disease to spread through the population is present. 

In order to minimize the possibility of a disease outbreak, I will need to do two things — monitor the plant and butterfly populations for diseased individuals and isolate them. It would be great if I could prevent all of the diseases that affect milkweeds or monarchs from arriving, but that isn’t possible. Insects arriving in the garden bring many diseases. Spraying insecticide to kill these insects is not an option because that would also kill the monarchs. Likewise, netting the plants would keep insects off them, but that would include the monarchs. So, I can’t prevent the arrival of insect-borne diseases. With that being the case, I need a plan to deal with insect-borne diseases, should any arrive. I can prevent fungal diseases by avoiding overhead watering and pruning the plants to increase airflow around them, if needed. 

One piece of good news is that I’ve never had a problem before. By the end of every season, my milkweeds are infested with milkweed aphids and milkweed bugs. And sometimes, their leaves get a bit mottled (suggesting some sort of disease). However, every spring the milkweed returns and is healthy. I’ve also never detected any problems with disease among the monarchs. I’ve had tachnid fly infestations, but I deal with that by raising the caterpillars in netted enclosures. 

My plan for dealing with disease is to monitor the plants and the butterflies (larvae and adults) for potential problems. If I detect a problem, I will isolate (or destroy) the diseased individuals. If a plant looks ill, I can simply remove it from the garden — hopefully before whatever it had spreads to other nearby plants. Likewise, if I see a caterpillar that looks ill, I can remove it from its enclosure and not add any new monarchs to that enclosure. I have several, so I can rotate through them and sanitize used enclosures before using them again. 

To make disease less able to spread quickly, I will also physically spread out my milkweed plants as best I can. This may not help much if an insect-borne disease arrives, as insects could easily fly from one side of my yard to the other. But it will help with any disease which spreads faster with physical proximity. I will also raise the monarch caterpillars in as many different enclosures as is feasible. That way, if an individual becomes diseased, the disease could only be spread within its enclosure — which could be sanitized before being used again. 

Other than tachnid flies, one of the biggest threats to monarchs is the protozoan Ophryocystis elektroscirrha (often simply referred to as OE). Given the seriousness of OE, I’ll devote an entire post to how I will deal with this, should it arrive in my garden. One of the major things gardeners can do to avoid an OE infestation is not grow non-native milkweed. All of my plants are natives, so that’s not a problem. But, the disease is still worthy of serious consideration. 

At the time I am posting this, it is about 5 weeks away from the milkweeds sprouting and maybe 6 or 7 weeks from the monarchs arriving at my garden in central Texas. I have a lot of milkweed seed cold conditioning (stratifying) right now and I also have several milkweed rhizomes in my refrigerator. These are in addition to the milkweeds in my container garden planters. Things should start heating up in early March. If you’re interested, I hope you follow me on my quest to 240.

Sprouting Tomato Seeds

I have planted my 2023 spring tomatoes over the past two weeks. Standard gardening advice is to plant tomato seeds 6–8 weeks before you anticipate putting the transplants in your garden. The best time for transplants is when all danger of frost has passed and overnight lows are 50 °F (10 °C) or above. For me, it’s now 8 weeks until that time. As such, I planted my tomatoes 1 or 2 weeks earlier than recommended. This is not a big deal. Last year, an early heat wave stopped my plants from setting fruit at what should have been the peak of their productivity. So I wanted to be sure to avoid that this year. 

Tomato seed packets and some tomato seeds. All these varieties are TYLCV-resistant cultivars given disease pressures in my area.

The tomato (Solanum lycopersicum) is a member of the nightshade family (Solanaceae), along with potatoes, peppers, tobacco, petunias, and others. This group also includes the poisonous plants Datura spp. (jimsonweed) and Atropa belladonna (deadly nightshade) — both of which of which I grow in my garden.

Planting Tomato Seeds

Planting tomatoes is very straightforward. To do so, fill your flats with potting mix and shake them to settle the soil. Take your finger and press lightly in the middle of each well of the flat, making a depression roughly 1/8” (0.3 cm) deep. Place one seed in each depression and sprinkle potting mix over each seed until it is covered. Getting the exact depth is not important. If you plant the seeds way too deep, over 1/2” (1.3 cm), the seedling will not reach the surface. Too shallow, and the seedling may fall over. However, anywhere in the ballpark of 1/8” (0.3 cm) will work fine. Another rule of thumb is that each tomato seed should be covered to a depth of roughly 3 seed widths.

Some newly sprouted tomatoes (left) and some slightly older tomatoes (right). When first sprouted, the plants unfurl their two cotyledons (seed leaves); next their first true leaves emerge from the stem, at right angles to the cotyledons.

Tending to Planted Seeds and Seedlings

While the seeds are sprouting, you will need to keep the potting mix damp. Tomatoes will do best when sprouted at 65–85 °F (18–30 °C). This is a wide range and standard room temperature falls within it. A seedling heating mat will bring seeds to the upper end of this range. I used a heating mat and my seeds started germinating on day 5. Of course, warm and damp is an invitation for mold or other fungi to start growing. However, tomatoes sprout more quickly than any fungus can get going, so it’s not a problem. 

Tomato seedlings in flats (left) and in 6″ planters (right). The true leaves have extended to become branches, from which multiple, multi-lobed leaves grow.

I keep the seedlings indoors overnight, where the temperature is 68–70 °F (20–21 °C), but set them out in the sunshine when the temperature outside is above 50 °F (10 °C).  On days when they can’t get any outside sun, they sit by a window and I turn on my grow light. During the seedling stage is when fungi can become a problem. To deter the growth of fungi, remove the flats from the heating mat and allow the top of the potting mix to dry out, or nearly so, between waterings.

In a couple months the plants will produce small, yellow flowers and set fruit. These are tomatoes from last year (2022).

I’m in USDA Plant Hardiness Zone 8B, so my gardening season is going to start a bit before most gardeners in the US. Keep watching this website for more vegetable gardening information. 

Early Growth Stages in a Nightshade

The early growth of deadly nightshade (Atropa belladonna) shows some typical features of a plant in the Solanaceae family. The Solanaceae is also called the nightshade family. Other plants in this family include tomatoes, chili peppers, potatoes, eggplant, and tobacco. As a gardener and a biologist, how plants grow interests me. And, with a bit of observation, it is easy to gain some understanding into how a tiny sprout eventually unfolds into a larger adult plant.

Deadly nightshade seeds from two sources. They germinate better if they are cold conditioned.

In this blog, I will highlight the early growth stages of a variety of plants. These will include common garden vegetables and native perennial wildflowers. Not only is this interesting, but it has a practical value. Most gardening guides show only adult plants, with flowers or hanging fruit, to illustrate an entry on a plant. However, it is helpful for a gardener to be able distinguish the small seedlings of desired plants from weeds and to be able to identify volunteer plants in a garden. In the spring, I will compare early tomato and pepper development to this plant. 

Most vegetable gardeners plant their seeds in the spring. The seeds sprout soon after and the plants flower and bear fruit while it is still warm. However, there are many perennial wildflowers that are best planted in the fall. Some of these will emerge during the winter and will die off when the weather warms up. Deadly nightshade is happy to sprout in cold temperatures. So is larkspur, which typically dies back when other early blooming wildflowers are just starting the bud. Deadly nightshade is notoriously hard to germinate, and how I got my seeds to sprout will be the topic of a separate post. But they are sprouting now, and by looking at the sprouts, you can see how the plant develops through its earliest stages. 

Flowering plants can be divided into dicots and monocots. The “cot” in dicot and monocot refers to the seed leaves, or cotyledons. Dicots have two. Monocots have one. Most common garden vegetables and wildflowers are dicots. Monocots are grassses such as corn, wheat, barley, oats, rice, etc. The cotyledons, along with the stem, are the first structures to appear above the soil when the plant sprouts. If a plant emerges and initially has two “leaves,” it’s a dicot. 

Left: Two seedlings that have just emerged. You can see the seed coats still attached to their cotyledons. Right: Same two a few days later, and a couple other new sprouts.

What happens next depends on the species of plant. In the case of deadly nightshade, the first true leaf emerges by itself. This single-lobed leaf is oriented perpendiciular to the long axis of the cotyledons. Next, the second leaf emerges opposite the first leaf. At the two-leaf stage, the two cotyledons and two leaves form a cross. 

Two seedlings at the first true leaf stage and one with the second leaf emerging.

This is not the only pattern in dicots, however. In some plants, the first two true leaves emerge opposite each other simultaneously. And what comes after that also varies. Some plants quickly elongate their stem and keep producing leaves at regular intervals. Others develop a large number of leaves to form a small mound of vegetation. But for now, here is how deadly nightshade starts its life cycle. More later. 

Seedlings with their second leaves, and one for which the third leaf is just emerging (far right).