10 Steps to Better Beer (Part 2)

gold-number-5

The final 5.

Here is the second half of my list of the top 10 steps towards brewing better beer. My hope is that new brewers can benefit from this by knowing where their efforts are best expended. Although I’ve ranked the items, and produced an argument for that ranking, none of these can be ignored. They are the top 10, after all. Even if the list extended to the top 100, everything on the list would have some degree of importance.

I’ve ranked the items on the list based on the degree that failing at a given step would have negative consequences that would overshadow any other things you did right. This ranking is an opinion, but I hope an informed opinion.

[Read more…]

Russian Imperial Stout (VIII: Fermentation: Aeration, Nutrients, and Temperature)

RISphoto

This is the eighth article in my series on Russian imperial stouts

If your wort has been chilled, and your yeast starter is ready, it’s time to get the fermentation started. The first thing you need to do is aerate the wort. Aeration helps build stronger yeast cell walls and allows the yeast to multiply faster. As with any big beer, the yeast have a tough job ahead of them. Be sure to give them all the help they need with regards to aeration. (See also my article, “Aeration Tips.”) 

Most of the time, you will want to give the wort one shot of oxygen prior to pitching, as with most beers. For the biggest examples of this style (in the 11–12% ABV range), however, you may want to give the wort a second shot of oxygen just prior to high kräusen.

[Read more…]

BWJ Q and A (Aeration)

IMG_1944

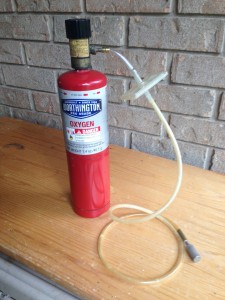
A common homebrew aeration setup.

Chris,

Do you have any good links/posts on getting the correct PPM per gallon of wort? Micron size vs. rate vs. volume?

Thanks,

— Robert French


As homebrewer’s, it’s nice that we can measure many of the important variables in our process. We can measure the density of our wort with either a hydrometer or a refractometer. We can measure temperature with a thermometer. We can measure the pH of wort or beer with a pH meter. Unfortunately, there are no inexpensive ways to measure a few key variables. Most homebrewers, for example, do not measure the amount of alcohol in their beer. They estimate the percentage by volume via a calculation. Likewise, the level of carbonation in our beer may be estimated either via a temperature and pressure table for keggers, or by adding the appropriate amount of priming sugar for those who bottle condition their beer. Arguably more important, however, is the amount of oxygen in our worts before we pitch the yeast. For most fermentations, an oxygen level around 8 ppm is desired. However, some strains of yeast may respond better to slightly higher levels of oxygen.

[Read more…]

All-Grain Brew Day Walkthrough (IX: Aeration)

IMG_1944

A standard wort oxygenation setup. A regulator sits atop a cylinder of welding oxygen. The oxygen passes through a HEPA filter on it’s was to the aeration stone, made of sintered stainless steel.

This is the nineth installment in the All-Grain Brew Day Walkthrough, which started with a post on strike water preparation.


Aside from cleanup, the last two things a brewer does on brew day is to aerate the wort and pitch the yeast. Pitching an adequate amount of yeast, and “feeding” it with an adequate amount of oxygen, will ensure an orderly fermentation. An orderly fermentation is one that starts in a reasonable time, proceeds smoothly, and reaches a reasonable final gravity.

Altering the pitching rate or aeration level in your beer can affect its aroma and flavor. If you lower the pitching rate below what is optimal, the yeast need to reproduce more to reach the proper density to ferment the wort. Since esters are primarily given off in the growth phase, under pitching leads to more estery beer. In a like manner, under aerating the wort also increases ester production. These effects are most easily seen in yeast strains that produce a lot of esters and other fermentation byproducts. Most estery English ale yeasts, “spicy” Belgian yeasts, and wheat beer yeast strains “clean up” noticeably when the pitching rate is increased above the optimal rate and the wort is well aerated. The effect is harder to notice in cleanly fermenting yeast strains.

In most cases, it’s best to pick a yeast strain with the fermentation characteristics you desire rather than trying to stress a yeast into producing more esters, or taming its fermentation byproducts through overpitching.

[Read more…]

Barleywine (VII: Fermentation I)

This article is part of a series on barleywine.


IMG_2389

Conducting an orderly fermentation is key to brewing a quality barleywine. The biggest key to doing this at home is to make an adequately-sized yeast starter and pitch enough yeast.

Making the wort for a barleywine can be trying. Sometimes the amount of grain required is more than your mash tun can hold. Sometimes you can’t collect all the wort you’d like because your kettle is too small. And for most all-grain versions, you need to boil the wort for an extended period of time. Even though wort production can be a chore, the part of brewing a barleywine in which the brewer can exercise the most influence on the quality of the final product is the next step — fermentation. If you make a yeast starter that is large enough, your fermentation can be handled like most ale fermentations, especially for smaller barleywines. For the largest barleywines, you may need to use some additional techniques to get all you want from the yeast,


Your Goals

Once the wort is chilled and in the fermenter, it’s time to let the yeast transform the wort into beer. In a barleywine fermentation, you have several goals. As with any fermentation, you want active fermentation to begin quickly. If your barleywine has a cap of kräusen and your airlock is gurgling between 8 and 16 hours after pitching the yeast, you’re doing great. If it takes longer than 24 hours to start, you may be headed for problems. (At a minimum, this could lead to a sluggish fermentation that takes longer than it should to finish). Likewise, once started, you want the fermentation to keep moving steadily until the beer’s target final gravity (FG) is reached. Most barleywines should finish in the high teens through the 20s. (The BJCP gives FG 1.018–1.030 for English barleywines and FG 1.016–1.030 for American barleywines as the proper range.) For beers at the lower end of the barleywine OG range (OG 1.080–1.090), this means you want a maximum apparent attenuation of around 75%. For heavier barleywines, apparent attenuation up to 80% is OK. The biggest key to achieving this is to pitch an adequate amount of yeast. Choosing an appropriate yeast strain is also important.

[Read more…]