What happens if you pitch one package of liquid yeast (~100 billion cells) to ale worts of various volumes and “gravity points?” Gravity points are the last two digits in the three digits following the decimal point in specific gravity. For example, a wort of SG 1.048 is said to have 48 gravity points.
Brewing the best beer possible requires the brewer to pay attention to each step during wort production and fermentation, and to execute each well. There are no “silver bullets” when it comes to making beer. In other words, there are no “do this one thing and your beer will turn out great every time” tricks to brewing — you need to do everything well to brew the best beer.
There are, however, practices that consistently lead to better homebrew, when all other things are held constant. I would argue the most important of these is raising enough yeast for an adequate pitch. For most homebrewers, this means making a yeast starter. As with most techniques in homebrewing, there are acceptable ways to make a yeast starter and the best ways.
Why Bother With a Yeast Starter?
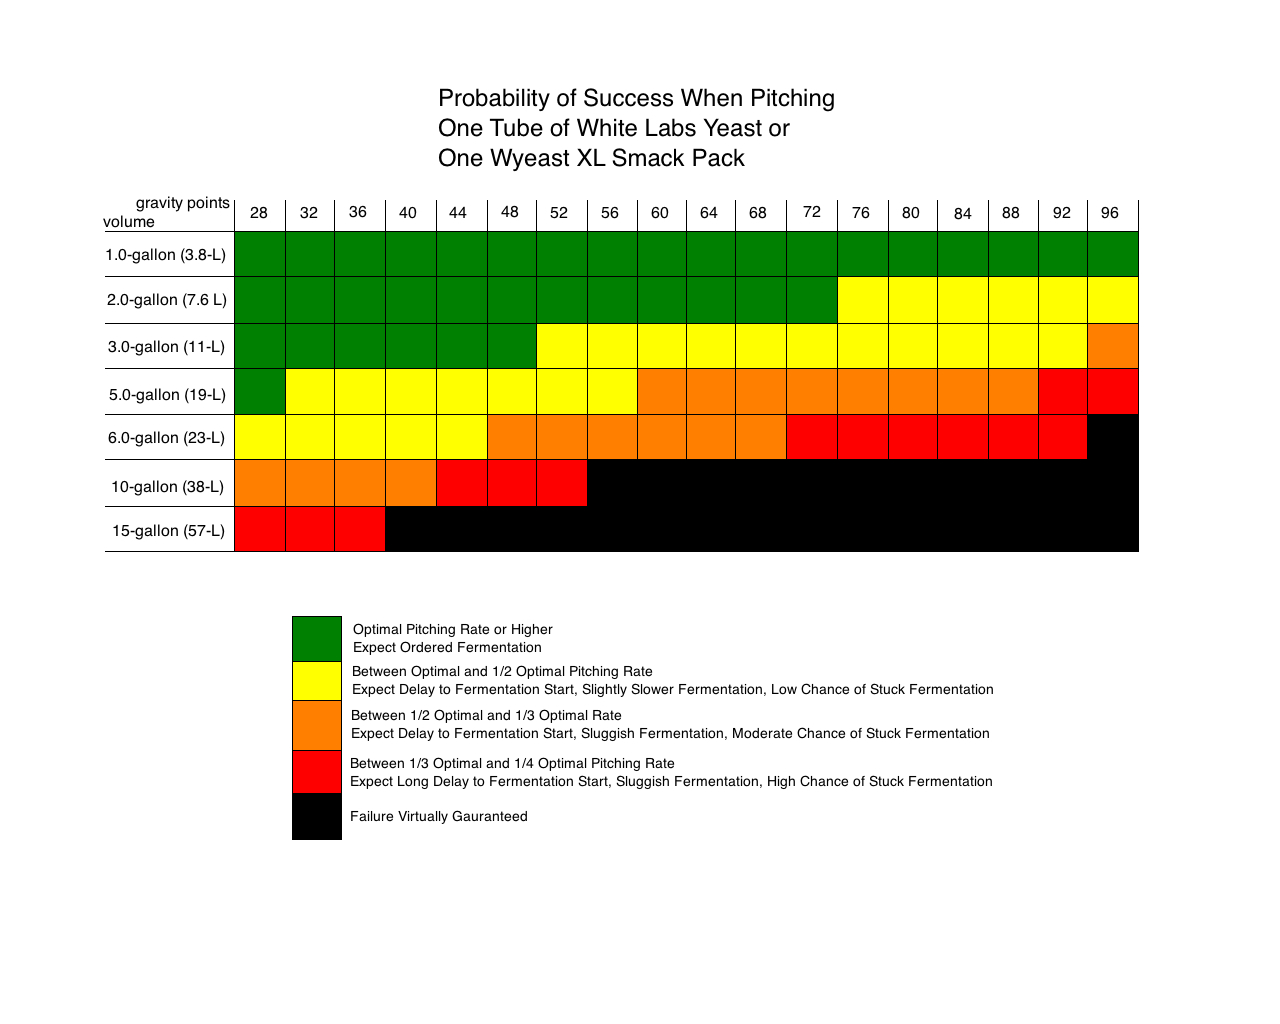
You can simply pitch tubes, smack packs, or sachets of yeast directly to chilled aerated wort. And, in many normal homebrewing situations, you will get a satisfactory fermentation. This is especially true when brewing smaller volumes of beer or lower-gravity beer. However, as the volume and original gravity of your brew increases, the odds that the number of cells in a typical homebrew-sized package is enough to yield an orderly fermentation decreases. Homebrew pitching calculators such as that found at Mr. Malty will help you determine the number of yeast cells you should have. See the chart accompanying this article too see the estimated probability of success when pitching a single, fresh tube of White Labs yeast or Wyeast XL smack pack (both of which should contain around 100 billion cells).
There are several reasons why making a yeast starter is a good idea. First and foremost, if you build a yeast starter of adequate volume, you will likely get a quick start to your fermentation. A quick start is beneficial because it limits the growth of contaminating microorganisms. The estimates of starter volumes varies somewhat between calculators. However, for all but the lowest-gravity beers (or small-volume batches), making a starter is always going to be preferable to not making one. The (usually small) differences in volume between recommended starter sizes is not something to worry overly about it.
Pitching an adequate amount of yeast also virtually ensures a fermentation that does not stall or stick, and that you will settle into a reasonable final gravity (FG) in reasonable amount of time. Underpitching big beers, such as barleywines or high-gravity Belgian beers, frequently leads to stuck fermentations.
Making a yeast starter also gives the homebrewer some peace of mind. When I pitch a batch, I know that fermentation is almost certainly going to start in a reasonable amount of time, and will proceed to completion in a reasonable amount of time. Since I started making yeast starters, I have not had a single stuck fermentation. Given all the work I put into wort production, the time I spend making a yeast starter is totally worth it to me because it takes away any worries I have about fermentation. (Well, most of them anyway.)
Even if a pitching rate calculator indicates I don’t need to make a starter, I usually make one anyway. Seeing the starter ferment confirms that the yeast in the tube is viable. (For low-gravity beers, I will sometimes rely on a smack pack swelling as confirmation of yeast viability.) No matter what the date on the tube or sachet is, it could have been mishandled somewhere along the line.
What Do You Want From a Yeast Starter?
There’s really only one thing you want from a yeast starter . . . yeast. You do not want off flavors or odors to come from it. Nor do you do not want it to add unwanted color to your wort. Most importantly, you do not want it to add contaminating microorganisms to your main batch of beer. In the conclusion to this article, I’ll explain the best ways to make a yeast starter with a focus on limiting contamination.
—
Related articles

Great article as usual. I look forward to the conclusion
Looking forward to the conclusion of this. I’ve already done more than enough reading on starters, but the more, the better!
The timing of your articles has been uncanny for me. When you started your big beer series, I was just starting to plan an RIS, and now I’m about to finally get myself properly into making starters, and I saw this article pop up. Here’s hoping that your next series aligns with whatever I decide to work on next! Hah.
How did you calculate the ‘probability?’ I don’ t disagree with the resulting charts, so much as I’m looking for a formula.
The green areas are areas with the optimal pitching rate or higher, the yellow areas indicate half the optimal pitching rate to the optimal rate and so forth as explained in the key. I used the Mr. Malty calculator — set to ales, liquid yeast, and initial oxygenation — for all the the calculations. The outcome descriptions are based on a pitching rate experiment James and I did a few years ago, plus information from the brewing literature, and personal experience. The Mr. Malty calculator not only gives the appropriate starter volumes, but tells you how many cells are needed. That’s where the numbers come from.
The next time that I make a yeast starter I’ll probably drop the OG down to keep from stressing the yeast. My DME-based wort was 1.045 and, while probably not a game changer, is on the high end of the range according to your article.