Adding hops to the fermenter is a great way too infuse your beer with aroma from the hop oils. Unlike oils extracted during the boil, oils added post-fermentation won’t be vaporized by heat or expelled by the outgassing of fermentation. There are two ways to boost your hop aroma by adding oils in the fermenter — dry hopping and adding an aroma extract. In this article, I’ll discuss dry hopping. In the next — which I’ll post later today — I’ll discuss making a homemade extract of hop oils and adding it to your beer.
Dry Hopping
Dry hopping is the practice of adding hops to beer that has finished fermenting. Whole hops are frequently used for this, but pellets work, too. For a 5.0-gallon (19-L) batch of homebrew, 1.0–1.5 oz. (28–43g) of hops works great for an American-style pale ale, around 2.0 oz. (57 g) for an American-style IPA and 2.5 oz. (71 g) or more for a double IPA. The hops should sit in contact with the beer for at least a few days and more commonly around a week to 10 days. After that, they should be removed or they can lend a grassy character to the beer. Dry hopping does not contribute any noticeable bitterness. This is because heat is required to isomerize alpha acids into iso-alpha acids (the primary molecules that confer hop bitterness). Dry hopping is usually done at the same temperature as the fermentation.
Disadvantages
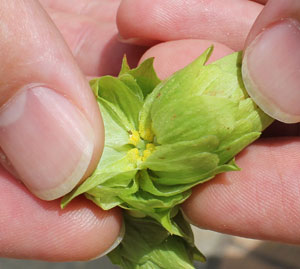
There are advantages and disadvantages to dry hopping. Heavily dry hopped beer can be hazy as tannins are also extracted as the hops steep. A little haze is common — and generally accepted as inevitable — in IPAs and double IPAs. Dry hopping can also lead to oxidation in your beer if you use whole hops. Air entrained between the bracteoles of the cones can dissolve into the beer and prime it go stale early. To avoid this, place the hops in a carbon dioxide rich environment before using them. The final drawback to dry hopping is the fact that a little beer absorbs into the hops and your yield is diminished slightly.
Many homebrewers wonder about sanitation when they first hear about dry hopping. In practice, dry hopping does not cause contaminated beer. This is likely because of the alcohol content and fairly low pH of the beer.
Advantages
Despite the haze and slight loss of volume, if fresh hops are used correctly, dry hopping lends a wonderful aroma that you can’t get no matter how many hops you add late in the boil or whirlpool. In many hoppy styles of beer, dry hopping is expected. Dry hopping works great because the hop oils are extracted, and they are trapped in the fermenter or keg.
How to Dry Hop
One way homebrewers dry hop is to place the hops — whole or pellet — in a nylon (or other mesh) bag and place the bag in their secondary fermenter or keg. You can tie a length of (unflavored) dental floss to the bag and seal the fermenter or keg with the floss hanging outside. (It’s thin enough that a rubber stopper or keg O-ring will still seal the vessel.) The floss is used to pull the bag out when the contact time is over.
Hops will float, so sometimes a sanitized, non-reactive weight is placed in the bag to weigh it down. A stainless steel fitting or small glass object can be used, as long as it can be cleaned and sanitized. Alternately, the homebrewer can swirl the vessel once or twice a day to make sure all the hops come in contact with beer. If you dry hop in a keg, be sure to purge the headspace after removing the dry hops.
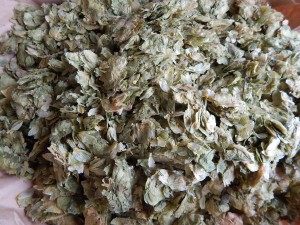
One of the biggest keys to success is evaluating your dry hops before using them. They should look green and smell fresh, not cheesy or otherwise off. The Cascades in the first photo have aged in the freezer beyond the point of being usable. You can see that they have lost the vibrant green color of fresh hops. And if you could smell them, you would detect a faint cheesiness creeping in. Smelling the hops is important because some imported (German) hops are sulfured, which makes the hops look greener.
If hops are stored in an airtight container, flushed of oxygen, they can age for years and still be usable. Their alpha acid content will have decreased greatly, but the oils can survive. Aged hops may be less green, but still smell good. In fact, some breweries intentionally age their aroma hops, believing it gives them a finer aroma. So, look for your dry hops to be green, but let your nose be the final judge of whether they are usable.
—


I have to say that I haven’t ever found any problems with keeping dry hops in for a long period if time. When I dry hop in the keg they can stay in for months and I don’t get any off flavors. I think it’s more common (based on anecdotal evidence) when you use continental or British varieties for dry hops. I always dry hop with American varieties and I haven’t had a problem.
If I leave the dry hops in too long, my beer starts to get an “iced tea” character to it. It’s not horrible at first, but definitely out of place in a beer.
I have only dried hopped once, and found it to be kind of a PITA, as I don’t keg. I heard some years back that Jamil Z. has frequently started putting nearly all hops in at about 5-10 minutes before KO instead of dry hopping, and says he likes this character better, and the aroma tends not to drop as fast. I use this technique frequently now and love the result, but having only dry hopped once, I don’t have much of a basis for comparison. Has anyone else employed both methods enough to be able to comment on them comparatively?
– Dennis, Life Fermented Blog
I don’t find dry hopping that difficult and I don’t keg either. I usually use pellets and dry hop right in the primary fermenter unless I am planning to harvest the yeast. I do think there is a sensory / mouthfeel character that dry hopping contributes in addition to aroma but thats not based on side by side experimentation.
I’d also add that the technique and speed of chilling has a big impact on hop character. I switched to a counterflow chiller a few months ago and am needing to adjust my recipes as the late hop additions now have a longer exposure to hot wort leading to increased bitterness and reduced flavor/aroma.
Are you saying the counterflow chiller slowed down your chilling? What did you switch from?
I think he’s saying this: With an immersion chiller, you chill all your wort down at once, starting the second you turn on the water. From that point, the entire volume is all gradually reduced to pitching temperature. With a counterflow chiller, each little volume of the hot wort sits in the kettle until it goes through the chiller and is cooled rapidly to pitching temperature. This change in the amount of time that hops are in contact with hot wort can necessitate altering your late hop schedule when you switch chilling methods.
I was actually thinking about doing an article on that sometime.