If you went through corporate training in the 1990s or saw the demonstration reel for the Video Toaster, you’re familiar with the term “paradigm shift.” Brew in a bag (BIAB) is a paradigm shift for all-grain homebrewing — a new way of thinking that is a break from the past.
Traditional thinking for all-grain brewing says you need three vessels: one to use as a hot liquor tank for heating water, another to use as a mash tun where wort (unfermented beer) is created, and a third where the wort is boiled and hops are added. BIAB calls for just one vessel – your brew kettle, where all of the above functions will happen.
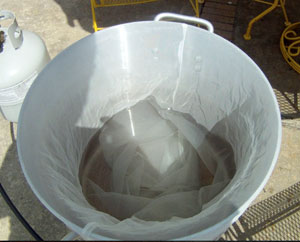
As you might expect, the key to the whole equation is a bag. In my case, I use a nylon bag that I purchased from my local homebrew shop that is sold for this specific purpose. Others make their own out of material such as voile. I’ve also heard from brewers who buy paint strainer bags from the local hardware store. The key is that the bag is big enough to line the kettle, strong enough to hold several pounds of wet grain, and safe in heated water. In other words, it won’t leach any hazardous or unsavory chemicals into the wort.
Traditional All Grain Brewing
Let’s step back for a second to look at how traditional all-grain brewing works, so we can compare and contrast.
First, malted grain, usually barley, is milled in a roller mill that crushes the kernels and opens them up to the water of the mash. The grain is added to hot water in a mash tun, which has a screen of some sort in the bottom to help filter the wort and a spigot to collect it. The mash rests for an hour or so at a temperature friendly to enzymes that turn starches into sugars. Yeast will later turn those sugars into alcohol and carbon dioxide through fermentation.
After the mash rests, the wort is recirculated from the bottom to the top of the mash tun until a filter bed of husks is established. Then, the wort is drained into a kettle for boiling. At this point, brewers have a choice. They can begin to add hot water at the top of the mash tun to replace the wort coming out of the spigot and rinse (sparge) sugars from the grain (lautering). This is called continuous sparging or “fly-sparging.” Alternately, they can let all of the “first runnings” run out of the mash tun, close the spigot, and add all of the sparge water at once. This is called “batch sparging.”
One of the advantages to BIAB is that you never have to worry about a stuck sparge. If too much wheat or rye is used, for example, or if the grain has been milled too aggressively, the mash could become gummed up in a mash tun, resulting in the wort being trapped in the gooey mess. To combat this, all grain brewers often use rice hulls to keep the wort running. But sometimes even rice hulls are not a guarantee.
After the wort is collected, it is boiled. Hops and other ingredients are added. At the end of the boil, the wort is chilled and transferred to a fermenter, where yeast is added (pitched).
The BIAB Process
For BIAB, all of the water to be used in the brewing process is added to a brewing kettle. This includes the “strike” water – water used in the initial mashing, sparge water – water used for rinsing sugars from the grain, and an amount of water to compensate for the liquid that will be absorbed in the grain after mashing. The water is heated to a temperature above what is needed for the saccharification rest, which is where starches are converted to sugars (149˚F – 158˚F or 65˚C – 70˚C). That strike temperature will come down when the grain is added. Online calculators are handy for figuring out what the strike temperature needs to be.
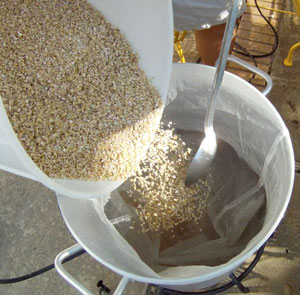
The bag is added to the kettle to line it, and the grain is stirred in. The temperature is checked again to ensure the proper temperature has been reached. Then, the mash rests for an hour or so while the enzymes do their jobs.
The resulting mash is much thinner than traditional all grain brewers are used to. This may scare some people because thin mashes are said to contribute to thin beer. However, I have brewed low gravity beers with water-to-grain ratios as high as 3.75 quarts per pound with good results.
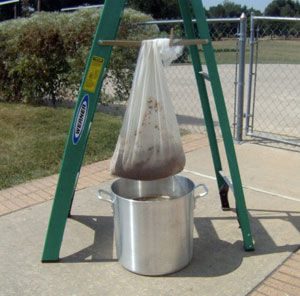
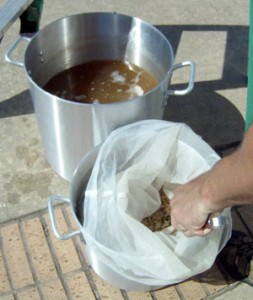
After the mash rest, the bag is simply removed and hung to drain above the kettle. I use the strut of a ladder as a handy place to hang the bag, but others go so far as to hang a pulley system in the ceiling of their garage.
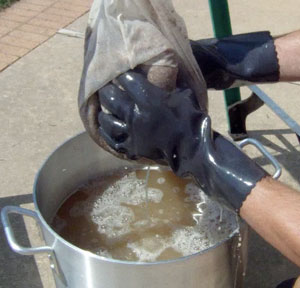
Some may fear astringency from squeezing grain bags, but I have no such fear. In fact, I have invested in a pair of rubber gloves designed for BBQ guys who handle hot racks of ribs and pork butts. The gloves keep my hands nice and cool as I squeeze the wort from the bag. [Insert your joke about bag squeezing here.]
If you’re a traditional BIAB brewer, that’s it. You’ve collected your wort, and you’re ready to proceed to boiling as in a standard all grain batch.
BIAB Variation
After getting feedback from listeners to Basic Brewing Radio, I have added a sparging step to my BIAB process. Instead of adding all of my brewing water initially, I reserve a gallon-and-a-half or so for sparging in a second smaller pot. During the mash rest, I heat that water to around 170˚F (77˚C). After draining the bag, I put it into the second kettle with the sparge water. I stir it a bit to rinse the grain, then remove the bag for draining (and squeezing). I haven’t evaluated how much this improves my efficiency, but it makes me feel better. And isn’t that what it’s all about?
BIAB Benefits
The first benefit that BIAB brings is a reduced cost of entry into all grain brewing. You don’t have to invest in a mash tun or three-teir system to brew great all grain beer. You still can, if you want to, though.
You’ll save time and effort with BIAB. I find my brew day is quicker because I’m not having to preheat and wash the cylindrical cooler that I use as a mash tun. Just a quick wash and ring out, and the bag is done.
You can mill more aggressively with BIAB. No worries about stuck sparges, so you can close the gap a bit on your grain mill, possibly leading to higher efficiencies of pulling sugars from the mash.
New beer styles are open to you through BIAB. I have brewed 100% wheat and even 100% rye beers using the bag that would have been completely impossible in my traditional mash tun. Again, no worries about a stuck sparge.
BIAB Drawbacks
There are a couple of things that I don’t like about BIAB that I see as fairly minor. First, there seems to be more trub in the kettle with BIAB batches. I think this must have something to do with the fact that the wort doesn’t go through the filter bed of a traditional lauter and sparge. However, this can be dealt with by compensating with higher pre-boil volumes.
Wet grain is heavy. The older I get, the less I want to deal with lifting up heavy weights. So, for higher gravity beers, I still use my traditional mash tun setup. I’m also too lazy to rig a pulley system in my garage ceiling.
If you’re not careful, bags can melt or scorch. The only time this has happened with me is when I was using a smaller kettle and the bag draped too close to the flame on the outside of the kettle. If you plan on adding heat during a mash, lift the bag out while the fire is on. Or, add a rack of some sort in the bottom of your kettle to keep the bag off the hot metal.
Conclusions
When I first heard about Brew in a bag, I was a skeptic. However, once I brewed my first batch, I was impressed and convinced that BIAB is here to stay as a legitimate brewing technique. Since then, I have brewed many BIAB batches, including a Pilsner that required a cereal mash. I believe almost any brewing technique can be modified to brew with a bag.
Since I own a mash tun, I still use it often. It’s great to have a tool kit with many tools.But, I often think that if BIAB were around when I first started brewing, I may never have purchased one.
Hear the Basic Brewing Radio episode where I first learned the details about BIAB.

I love BIAB, it’s the only way I brew now. But, one questions for everyone.
I installed a thermometer that extends a couple inches into my keggle. This was before I got into BIAB, was still doing extract and thinking about going traditional All-Grain. Anyone got ideas/tips/techniques for not tearing the nylon bag when pulling it out of the hot water at the end of the mash? I try my best everytime, but I always seem to snag it. Ugh.
SEP
P.S.Love the BBQ glove idea, been using spaghetti pot lids, gonna get myself a pair of those!
Yes, you gotta get some of those gloves. They’re fingerprint savers. As far as the thermometer, that’s a tricky one. My brewpot’s not that fancy. 🙂
I have the same kettle setup with thermometer probe. I use a stainless spoon as a mash paddle and insert the spoon between the bag and probe, inverted over the probe, in order to give the bag a smooth curved surface to slide past when pulling the bag.
I use my brew bag in conjunction with my 5 gal mash tun. When I get around to buying a propane burner and a larger brew pot I will be able to due a full boil with BIAB & No Chill Brewing.
I too use BIAB instead of the traditional all grain method. However, at the end of the mash & prior to the boil I will draw off a couple gallons of wort and pour back over the bag. I feel this additional step provides a “modified sparge” prior to squeezing the bag. Don’t know how much good it does, but it doesn’t hurt & makes me feel better
Mr Spencer,
I, too, use your modified biab with sparge water in case the efficiency is better. Here’s hoping.
My system includes a 3 gal pot so being that small I can actually preheat my oven to 170 degrees, turn it off, then put the biab setup inside where the residual heat in the oven holds the temperature beautifully. Of course, a full size pot would not work.
I am so happy with how biab works I could never imagine having to own and store all that big brewing stuff again!
Brent
Excellent. My oven won’t go down to mash temps, but my electric smoker will. Very handy for small batches.
Neither will ours, but the digital temp readout tracks the temp so when it is just below 170 I cut the power. Presto. Warm oven.
B
I use the basket from my turkey fryer, it holds the bag well and has a handle to lift it. I us an electric deep fryer to heat with, it is faster than a stove and cheaper energy than propane. I can use indoors. Electric turkey fryer was $24 on clearance after Thanksgiving normal price $120. Less stuff to clean easier brewing means I can do 2.5 gal batches more often so more experiments. I use a 3 gal carboy and a 2.5 gallon keg. for test batches. If I like it I do a 5 gal batch. I would have never bought all the other equipment if I knew about BIAB 10 years ago. Garage overhead door support frame is great place to hoist bag.
Very cool.
I do BIAB and I am very happy with it – just used a 40L catering kettle and a large sheet of voile.
A wire cake tray will do a nice job of keeping the bag out of trouble.
With BIAB, you definitely have more trub in the kettle, but one thing I have noticed since I started doing No Chill properly (i.e. in cubes) is that the trub settles quite well in the bottom of the cube, and you can siphon off the wort into your FV.
For my bigger beers I sparge, usually in a spare fermenter. After gravity has drained as much from the bag as it is likely to get, I pour hot water from my kitchen kettle over it. I can recover a lot of wort this way, and I have gotten decent efficiency from my highest gravity beers. For reference, the highest strength beer I did with BIAB, was a 6.5% IPA. High gravity beers are another achilles heel for BIAB – the water ratios can kill your efficiency.
Guys at our club have adapted BIAB tricks into their 3V systems. The obvious one is lining their mash-tun with a mash bag. Assists with stuck sparges, and makes cleaning the mash tun a zero hassle operation.
Probably the biggest benefit of BIAB, is that is has deconstructed how we think about brewing, and slaughtered many myths in the process. 3V brewing is scaled down industrial brewing, whereas BIAB is brewing minimalism that showcases the science involved.
Good info, Richard. I like the idea of integrating the bag into existing systems in creative ways. Andy Sparks and I brewed a big volume, high gravity oatmeal stout. We split the mash, so that three pounds of cooked oats went into a bag with ten pounds of two-row. The rest went into a traditional mash tun. In this way, we were able to ensure that the oats wouldn’t stick the mash. The beer turned out very well.
BIAB is simplicity. Friends who are BIAB’ers found that the engineer buried deep within them wanted to tweak the BIAB process to squeeze out every last drop of goodness. All attempts of pumps, circulation motors and other gadgets failed. It’s fun to dream up all sorts of things but…….. KISS (Keep It Simple Stupid) is still the best advice to follow.
Most Icelandic homebrewers use BIAB, and quite a few of them actually use pumps and temp control (myself included). I don’t think anybody’s had a problem with that setup. In fact, I’m close to completing my dream setup – a 72 liter SS kettle with a false bottom and a 5500W heating element, a recirculating pump and a PID temp controller. Perfect contol over my mash, and I can very easily do 40 liter batches. This is actually becoming quite a popular set up over here (although many use a smaller kettle).
Wow.
I’ll send you some pics, or maybe a video, when I have the new PID controller set up (shouldn’t be long now). I think you’d get a kick out of seeing how fancy a BIAB system can get. 😉
Looking forward to it.
I’ve been doing BIAB for about 2 years now. For various reasons, I do 2.5 gallon batches. To hold mash temperature, I use the double-boiler method. It holds the temp perfectly. I also sparge in a second kettle, leaving the bag in the water for about 15 minutes. Efficiency is typically 75-80%.
Looking at the ladder, couldn’t you bolt a pulley under the top rung? Also if the ladder is metallic you could keep the pot on the burner inside the ladder. When done wringing the bag, remove the bag and the ladder. Might try that myself!
Another possible advantage to having a pulley system is the ability to partially raise the bag when applying heat to kettle if that becomes necessary to recover the correct mash temperature or if the mash has multiple steps.
Good point.
I have been brewing with both a traditional outdoor single tier 3 vessel system and an indoor 20 gal. e-biab system for years. I find that I now brew on the indoor e-biab for 80% of my brews. The beer tastes great on both systems. The indoor e-biab does cost with the electrical setup ( pid controller,heating element, etc.), but it’s so nice to be warm indoor during the chilly winters. There are some old pictures on our website. Big fan of Basic Brewing .
Cheers, Gary! Also good to be inside in the A/C when it’s hot out. 🙂
My brewing friend and I each made a Russian Imperial Stout a few months back. Both beers were about 1.090-1.100. Russian Imperial Stouts are BIG beers and efficiency is a difficult, even with traditional mash methods.
We both used BIAB and managed to get 75% efficiency by just removing some of the base grain (about 5 pounds, if memory serves) and used 3 lbs of DME, added to the wort, after pulling the BIAB and before the boil started. We got the benefit of a complex grain bill, good efficiency, and a very easy brew day.
Both stouts turned out phenomenal! Actually the best homebrew Russian Imperial Stouts that I’ve had.
Just for grins (and because I’d never done it before), I took the leftover grain from BOTH batches of Russian Imperial Stout and mashed them a second time with 1 lb of two-row and 1 lb of wheat. My goal was to get a third, nearly-free beer out of this brewday. I was aiming for a brown ale, but actually ended up with a really tasty Chocolate Stout!
…to clarify, I ended up doing two mashes with that third beer, since there was so much grain. Did BIAB in two kettles with about 4 gallons or so of water in each, then combined the liquid and ended up boiling nearly two hours to get the volume right. Fortunately, I was tracking my volume loss and didn’t start adding my bittering hops until I had already reached half of my wanted final volume.
LONG brew day, but I got 3 tasty beers!
I did a similar thing once. It was my 30th birthday, in fact. I celebrated by brewing an imperial stout and a flanders red ale. When I was getting done I decided I should use the grains from those batches for something, so I made a nice stout for good measure. It was a long day, but man, the beer was amazing.
It’s been a while since I’ve done a partigyle brew. They are a lot of fun, especially when you improvise the smaller beer.
Wow. Very cool. BIAB is very flexible. Looks like you proved that.
James, how do you keep a constant temperature for the mash?
I’ve been using BIAB for over a year and it enabled me to move into all-grain at a time when I was out of work and couldn’t afford the usual 3 vessel system.
I’ve improvised a bit. I wrap my brew kettle with a 3-inch thick blanket of foam rubber and a 3″ foam rubber lid and it holds the temp quite well. I also pull the bag out and drop it into a 5 gallon bucket with a lot of holes drilled in the bottom which fits perfectly into the top of my brew kettle, suspended by the rim of the bucket. Then I just pour my sparge water into the bucket and let it slowly trickle down through the grain and into the kettle. Like you I squeeze the bag with gloves and haven’t noted any added astringency from doing this.
I want to thank you for Basic Brewing. I’ve learned so much from your podcasts!
Terry,
Sounds like you’ve got a great setup there. I usually wrap my brewpot in blankets and towels. That works pretty well for five-gallon batches. For small batches, I have been able to put the smaller brew pot into my electric smoker. There, I can hold a mash rock-solid. For even smaller batches on the stovetop, I usually have to apply a bit of heat about halfway through the mash (while stirring) to keep the mash rest fairly stable.
Glad you like the podcasts!
Remember if you need help with BIAB brewing please go to … BIABrewer.info for general or interactive advice.
http://www.biabrewer.info
I’ve dunk sparged and pour sparged my grain bag. I “squeeze” it by putting it in a colander in a pot, and pressing on it with a plate. No mess, no gloves, more wort. The colander should fit in the pot or the wort will spill down the sides.
Hola James, descubrí este método hace poco tiempo, espero que me dé buenos resultados. Todavía estoy esperando que termine de fermentar para embotellar y probar la golden ale que hice.
Saludos desde Argentina.
Javier