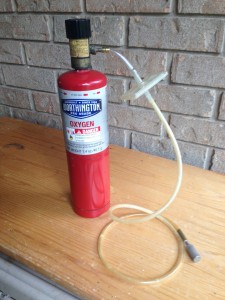
Many homebrewers oxygenate their wort with a simple set up like this.
Homebrewers aerate their wort in a variety of ways. Some simply shake their carboys or pour their wort back and forth between sanitized buckets. At the other end of the sophistication scale, some homebrewers have in-line aeration stones placed near the outflow end of their counterflow or plate chiller. Every bit of wort headed to the kettle flows past the stone, thoroughly aerating it. For many homebrewers, however, there’s a middle ground.
Lots of homebrewers, like me, have an aeration stone that they place in their fermenter after the chilled wort has been transferred into it. An aquarium pump or an oxygen cylinder pushes air or oxygen through a HEPA filter on it’s way to the aeration stone. This is an effective way to aerate homebrew wort, but a couple simple tips can help homebrewers get the most out of a setup like this.
Bubbles and Vortices
If you’re using an oxygen cylinder, it’s probably equipped with a small regulator to adjust the flow of oxygen. Unfortunately, most homebrew rigs lack a way of determining the flow of oxygen to the stone. (And, how much oxygen actually dissolves into the wort is another question with at least a couple major variables involved.) So how do you adjust the regulator to get a useful flow rate? What I do is focus on the bubbles. When you slowly turn the flow rate up on an oxygen cylinder, a few things happens. At first, tiny bubbles trickle out and most don’t reach the surface. As you turn the flow up, more bubbles come out of the stone, and they eventually start merging with others to form larger bubbles. Also, the commotion at the surface gets more an more intense as the flow rate increases. Here’s one way to look at this information.
Tiny bubbles have a larger surface-to-volume ratio than larger bubbles. In terms of using the gas (air or oxygen) you have efficiently, smaller bubbles are best as the surface of the bubble is where gas exchange occurs with the wort. Likewise in terms of using your gas efficiently — especially oxygen as it costs money — the less bubbling at the surface of your wort the better. Bubbles at the surface represents gas that is leaving your wort.
 On the other hand, your primary goal is to get oxygen to dissolve into your wort, not to use your gas efficiently. Turning up the flow helps you get that done faster (to a point), but it also results in bigger bubbles and more gas lost to the atmosphere. Here’s what I do to try to achieve my aeration goal without wasting excessive amounts of oxygen — swirl the wort as it’s being oxygenated.
If you simply run your aeration setup in still wort, the bubbles will rise from the stone in a column, aerating the wort that is flowing down past them. Each bubble will rise in more or less a straight line through the wort. However, if you swirl the wort in the fermenter, the bubbles will take a much longer course to reach the surface. Instead of a straight line from the stone to the surface, they will take a circular path as they are carried by the vortex in the fermenter. (The amount of time it takes the bubbles to rise won’t be changed, as the vertical distance is unchanged, but the overall distance they travel will be increased because of an added horizontal component.)
Likewise as bubbles rise vertically, they rise through wort that is progressively less aerated (at least at first). If you swirl the wort, the bubbles will also have less aerated wort flowing by them horizontally as well. The vortex will carry highly aerated wort away from the column of bubbles and bring less aerated wort into contact with the column. Swirling will also help mix the wort so the dissolved oxygen is more evenly distributed throughout the wort. So, if you aerate in your fermenter, swirling is a simple way to get more from your bubbles. You can swirl by holding the top of the fermenter and moving it in a circular motion or by stirring with a sanitized spoon, anything to get the wort rotating. If you brew outside and ferment in carboys, place a towel under the carboy so you aren’t grinding the glass against concrete as your swirl.
As for how far to turn up the gas flow, I like to watch and see that the flow is low enough that mostly tiny bubbles are produced and that only a slight churning and frothing occurs at the surface. This means I’m losing some gas to the atmosphere, but giving the wort lots of tiny bubbles. For 5 gallons (19 L) or wort, using this rule of thumb, I usually oxygenate for 1 minute and that has always worked for me. When I used an aquarium pump, I would aerate for about 5–10 minutes, which also always worked. In the absence of knowing the flow rate of your oxygen, you’ll have judge if the wort is getting enough oxygen by experience. For every batch you brew, write down when you pitch your yeast and when fermentation starts. If your ales — to which you pitched an adequate amount of yeast — take over 12 hours to start fermenting, increase your aeration time. For lagers that aren’t started warm, your lag time may be a little longer, but not by much because your pitching rate should be higher.
ADDENDUM — Bursting a Bubble
 Oxygen dissolving into wort follows the same old boring laws of physics that anything dissolving into anything else follows. Solutes (the things that gets dissolved, solid or gas) dissolve into solvents (the media the solute is dissolving into) faster at higher temperatures. You may have heard — and it’s true — that colder liquids can (generally) hold more dissolved gas. However, the capacity to hold gas (solubility) and the rate at which gas dissolves are two different things. (As some nameless Wikipedia author puts it, “The rate of dissolution and solubility should not be confused as they are different concepts, kinetic and thermodynamic, respectively.”) Why do I mention this? If you make a lager, you may want to aerate a little longer. Cold wort can hold ultimately more oxygen, but it takes more time to dissolve oxygen into it.

I just pour the wort vigorously through a strainer into the bucket. All my fermentations have started within 8 hours. I wonder if there might be a way to do an experiment to measure if there is a constant ratio of dissolved oxygen and delay using a particular yeast.
So far the simple method had worked for me, but I am interested in the details.
I use a 14 gallon conical, so I can’t move it around. I just swirl the hose around and around for 3 minutes. I use fermcap to control the foam, but still get lots on top. I am glad the lid of the conical is dome shaped. I can’t see how much oxygen is getting in, so I listen for it to start and watch the foam on top move around.
Moving the hose around as you aerate should help. At a minimum, you’ll keep the stone moving so it doesn’t end up in a volume of wort that’s relatively well-aerated. And if you start the wort rotating, all the better. (You could also do this with a sanitized spoon.)
Great read! Nice high-level review of mass transfer! When will we see the article on heat transfer inside a vessel during fermentation? 😉
A paint stirrer attached to a drill works well. I can see using O2 on the bigger beers, but for cream ales and such Im sticking to the paint stirrer.
Swirling the wort makes sense. Thank you for the idea.
I use an aeration wand from Williams Brewing. It lets me stir the wort while I’m aerating. I run it for 1 min at the lowest setting possible. However, I usually brew 3.5 gallon batches, so I don’t know if that’s the ideal amount of time.
It seems like I am the only person thus far willing to comment who uses an inline aeration stone with pure O2. This method both simplified and vastly improved my brewing. I think it was the best tool I ever bought apart from my plate chiller or stir plate. I can control both the flow rate of the wort coming from the chiller and the gas from the cylinder and get a desired aeration level without having to increase the time as I just increase/decrease the volume of wort exposed to a given amount of O2 depending on the beer. Both Williams Brewing and MoreBeer sell inline set ups at differing levels of sophistication. I’ll admit this was not cheap, but being stainless steel it should last many years.