Archives for June 2013

Colby House Porter

Colby House Porter

by Chris Colby


DESCRIPTION

This is an all-grain porter I have brewed, in one form or the other, over 25 times. It is a robust porter with a hint of molasses. (If you don’t tell anyone about the molasses, they probably won’t pick it up.) In some previous incarnations of the recipe, I also added brewers licorice. The first time I brewed it, back in 1991, the recipe was a slight alteration of a bock recipe from Charlie Papazian’s book. From there I’ve tweaked and retweaked it to my liking. (If you want it to compete at a BJCP contest, boost the OG and IBUs to the top of the category limit, or maybe 10% over.) The dark grains and hops are nicely balanced for a delicious aroma, full-flavor and very drinkable beer. This, along with my pale ale, is one my “go-to” beers that I try to have on tap as often as possible. My local water is high in carbonates and this is one of the few beer recipes I have that don’t require “cutting” my tap water with lots of distilled water.

[Read more…]

Dry Stout: Part 3 Hops and Boiling

[This is the final post in a three-part series on dry stout. The first and second installments were posted on June 19th and June 20th, respectively.]

IMG_1645

Beamish Stout is the third of the classic Irish dry stouts.


Hops and Boiling

Add any additional water needed to reach a reasonable pre-boil volume and boil this wort for 60–90 minutes. Most dry stouts are hopped with a single addition near the beginning of the boil. For “smoother, mellower” dry stouts — those with a little chocolate malt mixed in dark malts — aim for around 30 IBU. For more aggressively roasty dry stouts — those made solely with roasted barley  — aim for more IBUs, up to 40. (The BJCP gives 30–45 as the appropriate range.)


Yeast and Fermentation

Both Wyeast and White Labs package “Irish” yeast strains —  Wyeast Irish Ale Yeast (1084) and White Labs Irish Ale Yeast (WLP004) — and either of these will work well. Most British ale yeast strains will also produce a fine stout.

With the low starting gravity, a dry stout fermentation is not very stressful to the beer yeast. Be sure to aerate the wort well and pitch an adequate amount of yeast — a well-aerated 1 qt. (1 L) yeast starter will yield the right amount of yeast for 5 gallons (19 L) of wort around SG 1.040. Ferment the beer in the middle to middle-high end of the yeast’s fermentation range.

Primary fermentation should be finished within a few days. Let the beer sit on the yeast for a day or two (to mop up any residual diacetyl) at fermentation temperature, then rack the beer to bottles or keg.


Serving

If you are bottle conditioning the beer, prime to yield about 2.0 volumes of CO2 — substantially less fizzy than most American lagers, but in the range if many traditional British ales. You want just enough carbonation to form a nice head and give a slightly carbonated mouthfeel, but not so much that the beer tastes too thin or prickly. If you fermented at 70 °F, use 3.5 to 4.0 oz. of corn sugar (glucose monohydrate) per 5 gallons of beer to hit the right level.

If you are kegging your beer, you have the option of pushing the beer with a mixture of carbon dioxide (CO2) and nitrogen (N2). In order to do this, you need a separate tank and regulator, plus a stout faucet. This will give you the “nitrogen pour,” with the cascading foam, that many people think of when they think of dry stouts (and particularly Guinness).

However, keep in mind that a dry stout can be perfectly wonderful when pushed with CO2. My opinion is that the more aggressive dry stouts do well when pushed with nitrogen — the creamy mouthfeel from the fine nitrogen bubbles moderates the roasty bitterness. But for dry stouts with a bit of chocolate malt in them, I think you need the familiar prickly presence of CO2 (although the overall level should not be too high). In fact, I used to like Murphy’s in bottles (carbonated by CO2) back when I was in graduate school. Now that they have switched over to cans with a nitrogen widget, I don’t like it as much.

As a homebrewer, you can decide for yourself how to serve your stouts. If you can manage it, splitting one batch into two kegs and tasting them side by side — one pushed with CO2, the other with nitrogen and CO2 — can help you decide.


Dry Stout: Part 2 (Malts and Mashing)

[This is the second part in a three part series on dry stout. The first installment was posted June 19th and the last installment will be posted June 21.]

IMG_1621

Guinness Draught Stout poured from a widget can. The foam on Guinness is noticeably darker than that of Murphy’s.


Malts and Mashing

The grain bill for a dry stout can be astoundingly simple. Most Guinness clone recipes consist of around 10% roasted (unmalted) barley at around 500 °L, another 10% flaked (unmalted) barley and pale ale malt as the remaining malt. The target OG is around 1.040, so you yield a beer around 4.0% ABV. (The BJCP allows beers up to 1.050 and 5%, but “session” type dry stouts should stick to around 4.0% ABV. For reference, Murphy’s Irish Stout is 4.0% ABV, Beamish Irish Stout is 4.1% ABV and Guinness Draught is 4.2% ABV.)

If you’d like, you can blend small amounts of other dark grains (including chocolate or black patent) in with the roasted barley. Swapping some of the roasted barley for chocolate malt makes for a smoother stout. Some commercial stouts use either chocolate or black patent malt as their only dark grain. But, for dry stouts that taste more like the examples we are discussing here (Guinness, Murphy’s, Beamish), keep roasted barley as the most abundant dark grain.

Small amounts of crystal malt can be added, but not so much that they compete with the dark roasty character or add substantial body. Murphy’s Irish Stout contains just enough crystal malt that you can pick it out.

The pale part of the grain bill can be pale ale malt cut with about 10% flaked barley or you can use all malt. Flaked barley is unmalted barley that has been steamed and pressed into flakes by rollers; it is higher than malted barley in beta-glucans and this can aid in head retention. Some people will say that your base malt doesn’t matter in a beer this dark, the roasty flavors will cover it up. I don’t believe this and recommend using a good quality pale ale malt.

As with other dry styles of beer, you can dry the beer out by swapping table sugar (sucrose), which is 100% fermentable, for a small portion of the malt. However, a dry stout does not need to be bone dry or lacking in any body, so don’t go overboard in this respect. The low original gravity ensures you will reach a low finishing gravity, even with only moderate attenuation. More than 10% sugar in the grain bill would be excessive.

As an example of a dry stout, I give my favorite homebrew dry stout recipe, which was inspired by Murphy’s. This stout is formulated to be served with CO2, not the nitrogen mix that Guinness popularized.

Darkly roasted grains are smaller than pale malts, and you may need to mill your dark grains separately, tightening the mill gap slightly for the dark grains. Take note of how finely you crushed your dark grains — if your beer turns out excellent, you will want to be able to replicate that crush.

A single infusion mash is your best option for a dry stout. You want a dry beer, so mash at 148–152 °F (64–67) for around 45–60 minutes. A regular mash thickness of around 1.2–1.4 qts./lb. (2.5–2.9 L/kg) will work fine. Since your overall grain bill is small, you may need to stop sparging before you collect your full pre-boil volume of wort. As you sparge the grain bed, the gravity of the runnings decrease and the pH increases. There is a point at which the pH can get high enough to extract excess tannins. So, it’s best to stop collecting wort when the runnings drop below 2 °Plato (1.008) or the pH exceeds 5.8. A dry stout will likely have a hint of astringency from the high level of dark grains, and this is not a bad thing. However, oversparging can exacerbate this and should be avoided.

This series of posts on dry stouts concludes on June 21st.

Dry Stout Recipes

[Here’s a dry stout recipe, all-grain and extract versions, presented in both English units and metric units.]

IMG_1633

The Cure from Cork 

(Murphy’s-like Dry Stout/all-grain)

by Chris Colby


DESCRIPTION

This is a dry stout reminiscent of Murphy’s Pub Draught, now sold in widget cans. Murphy’s stout is slightly mellower — a little less bitter with a hint of chocolate and caramel in the malt — than Guinness, and (in my opinion) also tastes better when carbonated with CO2, as opposed to pushed with beer gas. If you like session ales — and are disappointed you can’t find Murphy’s except in widget cans — this is a great recipe to try.

[Read more…]

Use Those Homegrown Hops!

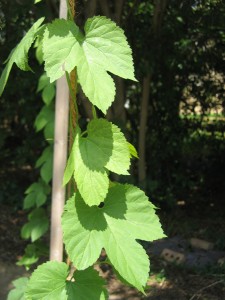
IMG_1763

Leaves on a homegrown hop plant.

Growing your own hops is a rewarding experience for any homebrewer. The bines are easy to grow, beautiful and can add a nice decorative touch to your house. (Hop vines are a particular type of vine called a bine.) Plus, growing hops gives many brewers a feeling of being a little closer to their hobby. And, most importantly, homegrown hops supply you with an ingredient for your homebrews.

Some online sources, however, give home hop growers bad advice when it comes to using homegrown hops. Many times, you will hear people warn growers off using homegrown hops because the alpha acid levels are unknown. These people will say you should only use them for dry hopping or late hopping. This is ridiculous. You have an ingredient that you grew yourself; it could not be fresher — use it!

It is perfectly fine to brew a beer without calculating the IBUs. People cook all the time without knowing the strength of their spices. (Few spices, other than chilis, even have a rating.) And brewers brewed for centuries before alpha acid levels began to be measured. (Also, the alpha acid rating of hops declines over time and few homebrewers take this into consideration — unless you calculate the alphas lost over time every time you brew, you’re already brewing without knowing your actual alpha acid content.)

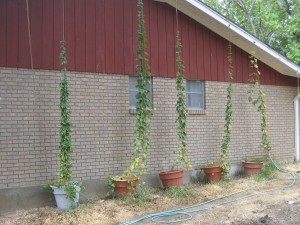
IMG_2075

First year hops growing up the side of a house.

Hop varieties have a typical alpha acid range and you can simply pick a midpoint value for a ballpark estimate of your homegrown hops alpha acid content. If you really feel the need to narrow things down, brew a small batch of beer with only one (bittering) addition of hops and taste it to estimate the level of IBUs. Then you can go to your homebrew recipe calculator and figure out what the alpha level would had to have been to yield a beer of that IBUs. Your estimate will only be as good as your palate, but you should be able to get an estimate that is accurate to within a percentage point .

You certainly can use your homegrown hops for dry hopping or late additions, but don’t let anyone talk you out of using the cones you grew yourself as bittering hops. The point of brewing is to make great beer, not to generate an estimate of IBUs.

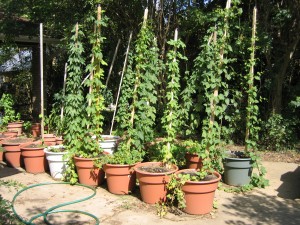
IMG_1428

Home being grown on containers, using an adjustable trellis.

Dry Stout: Part 1 (Intro and Water)

[This is the first in a three-part series on dry stout. Part 2 will be posted June 20th and part 3 will be posted June 21st.]

IMG_1646

Murphy’s Stout, poured from a nitro widget can. Murphy’s-style homebrews also taste great when served with carbon dioxide only.

As a homebrewer and beer drinker, I hope that the current resurgence of interest in session beers follows through to a full-fledged renaissance. My favorite session beer is Irish dry stout, exemplified on the commercial side by Guinness, Murphy’s and Beamish. Although low in alcohol and body, it is full of roasty goodness. Dry stout is a great style of beer for those who want lots of flavor, but also want to enjoy several beers before calling it a night.

Dry stout lacks the strength of a foreign export (or imperial) stout, the chewy body of an oatmeal stout and the sweetness of a sweet or milk stout. (In alcoholic beverages, “dry” means not sweet.) But dry stout is not about what is missing — it’s about the wonderful character from the darkly roasted grains, which give the beer a coffee-like flavor and aroma. Without the sweetness, body and alcohol of other stouts, the roasted grain character takes center stage. The key to brewing a great dry stout is to focus on getting the best dark grain flavor, with enough support from the other elements of the beer to round things out.


Water

Compared to most beers, dry stouts contain a large percentage (often around 10%) of the darkest roasted grains. If you were to brew a dry stout using water suited to brewing a pale beer, the result would likely be an overly acidic beer that tasted thin and did not show a pleasing dark-grain character. This is because dark grains release acids into the mash and lower its pH. As such, for most brewers, brewing the best dry stout will require some water treatment.

Calcium carbonate or sodium bicarbonate are the most common minerals added to a dry stout’s brewing liquor. In the right amounts, the carbonates from these molecules will neutralize enough of the acids from the dark grains to yield a proper mash pH of 5.2–5.6. Determining the right amounts is best done with brewing calculator, such as John Palmer’s water spreadsheet. Your target mineral content for a dry stout should be calcium (Ca++) in the 50–100 ppm range and carbonate (HCO3) in the 150–250 ppm range. If you started with water that lacked any minerals, adding about 1–2 tsp calcium chloride (CaCl2) and 1–1.5 tsp. sodium bicarbonate (NaHCO3) to 5 gallons (19 L) would work. Properly treated, your brewing liquor will cause the mash to fall within the right pH range and the finished beer to showcase the dark grains in the best possible way.

Continued in part 2, to be posted June 20th.

Malt Conditioning

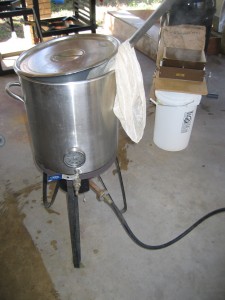
IMG_2584

Steaming malt for 30 seconds is an easy way to condition your malt in your home brewery.

When a homebrewer crushes his or her malt, he or she must consider two opposing factors when determining how finely to crush. The more finely he crushes, the more the malt endospermwill be broken into small pieces and the better his extract efficiency will be. On the other hand, if the husks are broken into pieces that are too small, lautering may become more difficult and the possibility of extracting too many tannins rises. So, when setting the mill gap, the brewer chooses a compromise setting that gives an acceptable level of extract efficiency without interfering with the ability to lauter.

For homebrewers willing to put in a little more effort, there is a way to crush the endosperm more finely, but not break the husks into too many pieces — malt conditioning. In malt conditioning, the husks are moistened just enough to make them slightly leathery and hold together a bit better when they pass through the rollers of a grain mill.

Malt conditioning is fairly common in commercial breweries, but it is easy to adapt to a home brewery. If you have the right equipment, the simplest way to condition malt is to steam it. If you have a heatable mash tun with a false bottom, add enough water to fill about half the space under the false bottom and bring it to a hard boil. Place your (uncrushed) grains in a large nylon steeping sack and place the sack in your mash tun. Put the lid loosely on the mash tun, leaving a small gap to let steam escape. After only 30 seconds, pull the bag out and pour them into an empty container, like a brewing bucket. Stir them with your hand and let them sit for about 2 minutes (or long enough so any liquid on the surface of any of the grains gets absorbed). While the husks are still faintly “leathery,” proceed with milling. Don’t let the malt sit for an extended amount of time after steaming it — do this immediately before crushing.

To fully take advantage of the mat conditioning, experiment with adjusting your mill gap to find a new compromise between crushing the endosperm and breaking up the husks.

IMG_2587

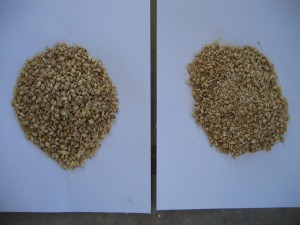
Conditioned malt (left) vs. dry milled malt (right). Note the larger husk size on the conditioned side.

This method is simple, presuming you have the equipment, and fast. (The actual steaming part goes by very quickly.) Plus, it is reliable. First of all it uses hot water. Malt takes up hot water (in this case, steam) faster than it does cold water and steaming ensures a reasonably even uptake of water. The grains on the very bottom of the bag may get a little wetter than the rest, but that’s not a problem. And, if you want to ensure a more even conditioning, you can process your malt in small batches, so that the “grain bed” getting steamed is only 3 to 4 inches high. Just steam some of the grain, crush it and go steam the next portion and repeat until all the malt is crushed. In addition, it is hard to overdo it with this method.

Other methods for doing this at home exist, for example, see Kai Troister’s method on his webpage.

Of course, dry milling works well for most homebrewers. If you are getting results that you consider acceptable from that, going through the added step of malt conditioning may not be worth your time. However, if you’d like to either increase your extract efficiency or routinely experience lautering problems, give malt conditioning a try.

Can CO2 Form a “Blanket?”

708px-Carbon_dioxide_3D_spacefill

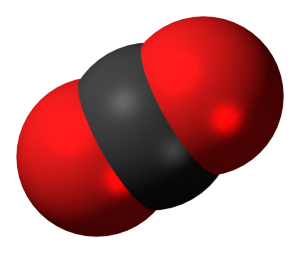
A space filling model of carbon dioxide (CO2). The black center portion of the molecule represent carbon and the two oxygens are depicted in red.

Carbon dioxide (CO2) is an important component of almost all beers. Unless the beer is still (uncarbonated), carbon dioxide gas gives it its fizz. This fizz lifts the beer’s aromas up to the beer drinker’s nose and helps form and sustain the foam. A small percentage of the gaseous CO2 in beer reacts to form carbonic acid (H2CO3), which is a dissolved solid that lowers beer pH slightly and gives at a bit of “zing.”

Carbon dioxide (CO2) is a simple molecule, just a central carbon atom with two oxygen atoms bound to it. Still, some misunderstandings about this molecule exist in the homebrewing and home winemaking community and correcting these could help brewers both improve their brewing process and understand the safety-related aspects of dealing with CO2.


CO2 “Blanket”

One idea that exists in both the homebrewing and home winemaking hobbies is that CO2 can form a “blanket” that will sit atop a fermenting or conditioning beverage and protect it from oxygen (O2). Sometimes, the idea is explained this way — CO2 is heavier than air and will sit at the bottom of an air-filled space and form a barrier to oxygen getting through.

Other folks have objected to this idea, claiming that CO2 is fully miscible in air. In support of this idea, one of the ideal gas laws (relating to the partial pressure of gases in a closed system) is cited as evidence that CO2 cannot pool or form a protective “blanket” over a batch of beer.

In reality, both ideas have elements that are true. If you pumped CO2 and oxygen (O2) into a sealed container and waited, they would eventually be evenly mixed throughout the space. The key to that sentence — and the whole “CO2 blanket” idea — is the word “eventually.”

[Read more…]

Three CO2 Thought Experiments

This is a short post in support of the “Can CO2 Form a “Blanket?” post.

Experiment #1

Let do a few simple thought experiments, and see what would happen if we mixed two gases under different circumstances. Let’s imagine we have a sealed container with a barrier in the center, dividing the container into two equal spaces, upper and lower. The barrier can be removed (without unsealing the container) to create one continuous space.

For our first experiment, lets pump CO2 into the bottom chamber until it displaces any previous gas and likewise fill the top chamber with O2. Let’s assume that both gases are at the same temperature and the same pressure. Now let’s quickly slide the barrier away and see what happens. The instant the barrier is remover, some CO2 molecules from the bottom half of the container would move into the O2 space and vice versa. They would continue until they hit another molecule and bounced off of it. At the interface, a little game of atomic billiards would have started. CO2 molecules, bouncing around randomly would enter the top chamber and, at first, mostly be bounced back by O2 molecules heading down into the bottom space. As time progressed, the space near the initial interface would become progressively more mixed and some CO2 molecules would, simply by the luck of how they were bouncing around, creep closer and closer to the top of the O2 chamber. And, the reverse would be happening with the O2 molecules; as time went on greater numbers of them would be headed towards the bottom of the container.

As the experiment unfolded, the concentration of each of the gases would form a gradient — almost all CO2 near the bottom of the container, almost no CO2 near the top, with the reverse holding for the O2. Finally, the gradients would disappear as the random jumbling of the molecules thoroughly mixed the gases in the chamber.

At the end of the experiment, the ideal gas laws would describe the container quite well. However, at the beginning of the experiment, they would not. That’s because the ideal gas laws describe the equilibrium condition of a system. The ideal gas laws have bothing to say about systems that are not at equilibrium or how fast they will approach equilibrium — which again is the key to understanding the idea of a CO2 blanket.


Experiment #2

Now let’s modify our experiment and run it again. We’ll do everything the same except that — as the experiment progresses — we’ll keep pumping CO2 into the bottom chamber (from the bottom) and we’ll release any excess pressure through a valve at the top of the chamber. In this case, when the barrier is removed and the atomic billiards begin, extra CO2 molecules are entering the chamber from the bottom, slowing the progress of O2 molecules, compared to the previous experiment. Over time, since CO2 is being added, and O2 can only be lost, the chamber will eventually contain pure CO2.


Experiment #3

Now, let’s modify the experiment one last time and rerun it. In this let’s start with the conditions of the first experiment except for one thing, let’s make the CO2 colder than the O2. If we run this experiment, the results are similar to what we got in the first experiment, only it took longer for the system to reach equilibrium. The game of atomic billiards was slowed because the CO2 molecules were (on average) moving slower than the O2 molecules and it took longer for the whole jumble to get evenly mixed.

Lake Nyos — The Carbonated Lake

This post is a sidebar to the “Can CO2 Form a Blanket?” post.

Screen shot 2013-06-20 at 2.59.20 PM

Lake Nyos as seen in a Goggle Maps view. (The “A” shows the location of the lake.)

Lake Nyos is a deep crater lake located on the side of a dormant volcano in Cameroon. The lake sits atop a pool of magma that releases CO2 into the waters to the degree that, back in the early 1980s, the lake was saturated with CO2. (Actually, the lake was found to be “supersaturated” — temporarily holding more CO2 than it should at equilibrium, like a just-opened beer.) At the depths of the lake, the water pressure holds (literally) tons of CO2 in solution, in exactly the same way that the pressure in a beer keg keeps high levels of CO2 dissolved in beer. In the upper levels of the lake, progressively less CO2 is trapped.

In 1986, a violent outgassing (perhaps caused by a landslide into the lake) caused CO2 to erupt from the lake and flow down the slope of the volcano. The level of the lake, whipped into a foam, was lifted about 100 ft. above its normal level. Scientists estimate the gas flowing down the volcano was over 150 feet thick and traveled at speeds up to around 30 mph. In towns in the valleys below the lake, 1,700 people suffocated (as did about 3,500 head of livestock).

After the eruption, scientists began looking for other lakes that could pose a danger in this way. (One lake near Nyos, Lake Monoun had erupted in 1984, killing 37.) Lake Kivu in The Democratic Republic of Congo was also found to be saturated with CO2 (in addition to containing large amounts of methane). Scientists are concerned about this lake because it is 2,000 times as large as Lake Nyos and is in a more heavily populated area.

Limnic_degassing1

French scientists are degassing Lake Nyos in the hopes of preventing future catastrophes. (See http://pagesperso-orange.fr/mhalb/nyos/ for more info.)

Lake Nyos today is being degassed. A long tube, extending deep into the lake from a floating platform, was placed in the lake and a constant geyser of bubbly water erupts from it, taking CO2 out of solution. However, the lake remains a concern because the natural “dike” that holds the water on the side of the volcano is eroding. If it gave way, not only would all the water rush into the surrounding valleys, but an enormous amount of CO2 — much more than in the 1986 lake eruption — would be released.