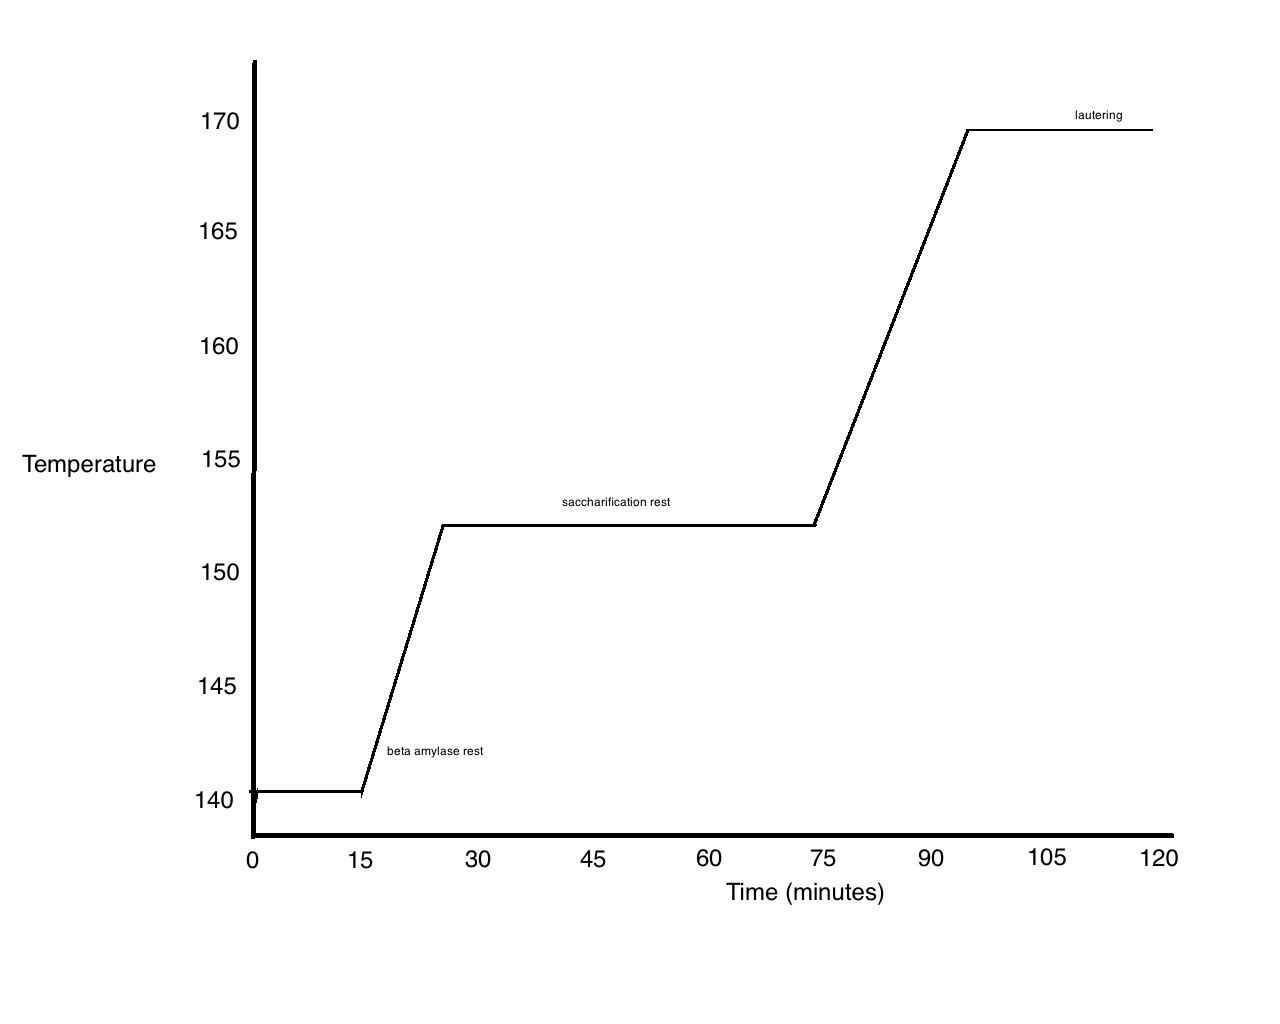
A step mash for brewing a dry beer. A 15-minute rest at 140 °F (60 °C) is followed by heating the mash to a roughly 45-minute rest at 152 °F (64 °C). Finally, the mash is heated to 170 °F (77 °C) for a mash out. (Click to Enlarge.)
Sometimes the simplest approach is the best. When brewing with fully-modified malts — as most malts are these days — a single infusion mash is almost always your best bet. The maltster has taken care of many of the issues (gums, proteins) that would have required a step mash. In most cases, performing a step mash is at best a waste of time. At worst, it can decrease the quality of your foam. And, by varying the mash temperature of your single infusion mash, you can make wort with varying degrees of fermentability. For most styles of beer, this range of fermentability is adequate.
However, there are some times when a step mash is just the thing. If you are brewing with undermodified malt, a step mash is highly recommended. (If you single infusion mash, you may end up with too many proteins in your wort and gums (glucans) may make lautering difficult.) I’ll cover this approach in a later article on decoction mashing (a type of step mashing).
You can make wort with a fermentability high enough to make a reasonably dry beer using a single infusion mash. However, sometimes you may want to brew a significantly drier beer. For example, you may wish to brew a beer that is very hop forward. To do so, you may want to keep the body and sweetness from the malt lower than could have been achieved with a single infusion mash. Or, you might want to brew a very crisp, thirst-quenching beer for summer or after workouts. If you’d like to achieve a higher level of wort fermentability than can be obtained with a single infusion mash, to brew a correspondingly drier beer, a step mash can help you do so. And, a step mash need not be overly complicated or time consuming. Here is the simplest way to perform a step mash.
Simple Heated Step Mash
You don’t need a heatable mash tun to do a heated step mash — you can mash in your kettle and transfer the mash to your lauter tun when you are finished. If you have a RIMS or HERMS rig, of course, you can heat in your mash tun. I have a stainless steel mash tun with a false bottom. Although I could heat that directly, I prefer to do heated step mashes in my kettle because I think the false bottom traps heat. It’s easy to heat your mash in your kettle and simply scoop it over to the lauter tun when finished — easier, in my opinion, than raising the rest temperatures via infusions of boiling water or pulling decoctions.
To make a drier beer, from fully modified malt, you want to mash in to the range of temperatures in which beta amylase is most active. This range is often given as 140–145 °F (60–63 °C). The mash is rested in this range for a period of time, then the mash is heated into the saccharification range. The longer the low temperature rest, the drier the beer.
Beta Amylase Rest
To start a heated step mash, mash in at your normal liquor-to-grist ratio. Have the temperature settle into the 140–145 °F (60–63 °C) range. If your goal is to brew a beer slightly drier than could be achieved with a single infusion mash, immediately begin heating the mash into the saccharification range 148–162 °F (64–72 °C). If your goal if to brew a significantly drier beer, employ a longer rest before you start heating. In most cases, 15–20 minutes should raise the fermentability of your wort noticeably. However, for very dry beers, you can use even longer rests — up to a couple hours, even.
Heating the Mash
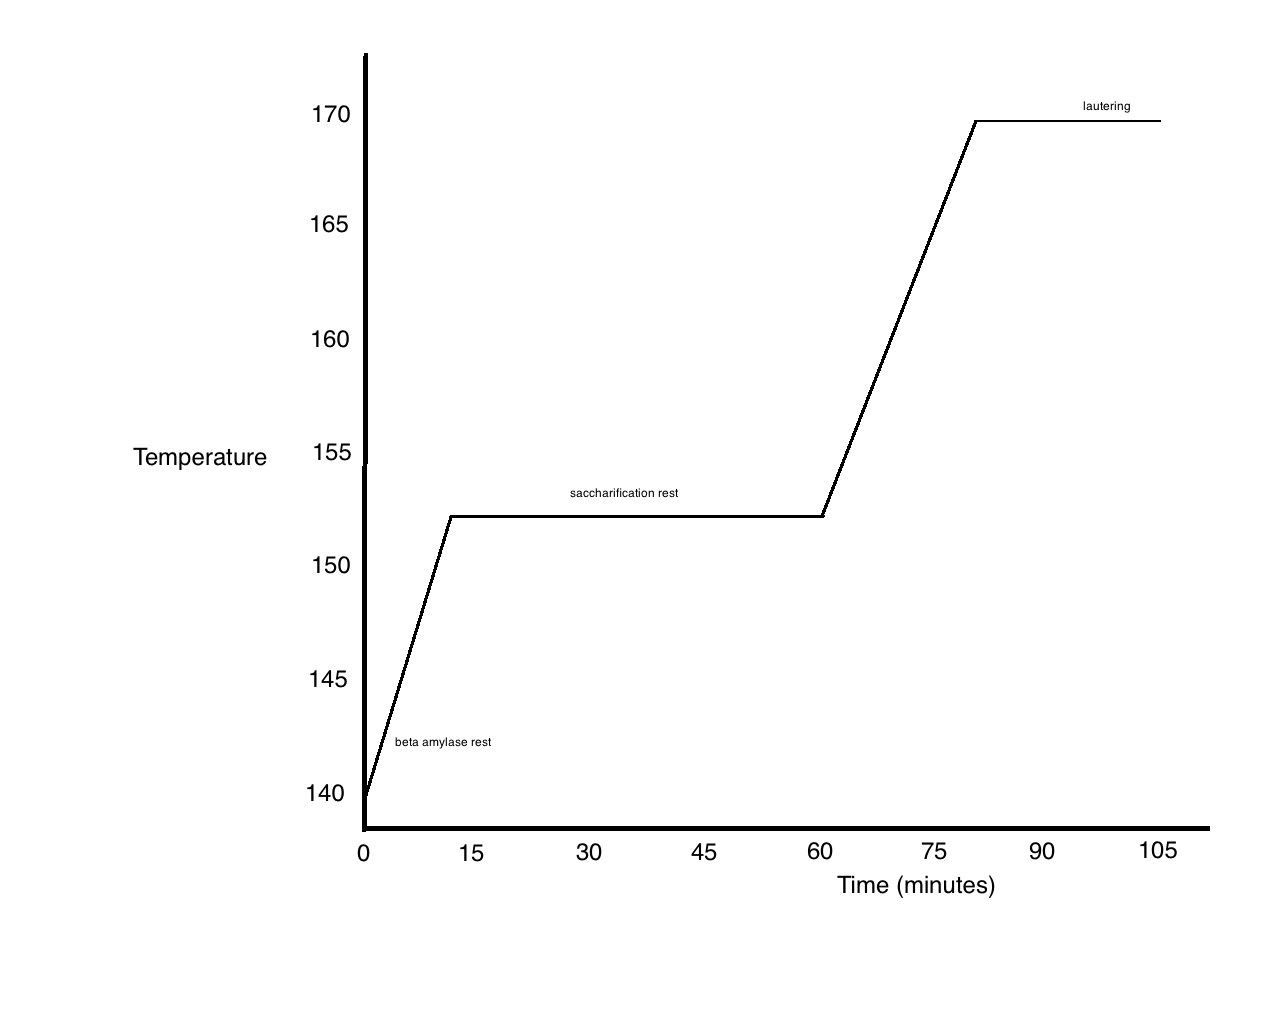
In this step mash, the mash is heated immediately after mashing in. The temperature ramps through the beta amylase range on its way to the saccharification range. This raises the fermentability only slightly, but does not take very long. (Click to Enlarge.)
On most homebrew setups, heating the mash at a rate of about 2 °F (1 °C) per minute will work well. If you heat more slowly, the length of your brewday can get too long. Conversely, if you heat more quickly, the odds of scorching the malt or overshooting your next rest temperature increases. At 2 °F (1 °C) per minute, you’re heating relatively quickly and keeping the risks of overheating manageable. Your mileage may vary, depending on your system.
At 2 °F (1 °C) per minute, a ramp from the beta amylase range to the saccharification range will take between 6 and 44 minutes, depending on the initial and saccharification rest temperatures. A ramp from 140 °F (60 °C) to 152 °F (67 °C), a very reasonable set of rests, would take 24 minutes.
As you approach your target rest temperature, back of the heat a little. I usually turn down the burner when I’m within 4 °F (2 °C) of my target and then again when I’m within 2 °F (1 °C). This makes it easier to avoid or minimize overshooting the temperature. It takes time for heat to transfer from the metal of your kettle to your mash. So if you heat at a steady rate and only cut the heat right when you hit your target, the temperature will continue to climb a bit afterward. The amount of overshoot depends mostly on the how much heat is retained in the metal (which in turn is largely a function of how thick it is). Smaller overshoots can sometimes be dealt with by stirring the mash vigorously for a few minutes. Or, cool water can be stirred in to bring the mash temperature down.
When deciding how long to rest in the beta amylase range, be sure to consider both the duration of the rest, and the time taken to heat the mash to the next rest.
Stir!
When heating your mash, you’ll need to stir it nearly constantly. It is very easy to scorch a mash when applying direct heat. This is doubly true for thicker mashes. Stir in circles that both move the mash horizontally and vertically. Essentially, stir so that the hottest bits of mash, near the bottom of the kettle, are swept up towards the top of the grain bed, not just rotating around the bottom of the kettle.
This article will conclude tomorrow with a discussion of how long to rest in the saccharification range, tips for scooping your mash to your lauter tun, and some other thoughts on brewing a dry beer (including malt selection). The final segments in the Barley Starch For Brewers series will be posted later in the week.
—
Related articles

I really want to try Basic brewing’s sour wort recipe, where a single infusion was preformed followed by a reduction in the mash temperature to 120°F. This is a beer I typically step mash, which while good, takes forever to brew. If their result can both shave a little time off the brew day, and produce a beer just as good, I’m willing to give it a try.
That’s a step in a different direction, and for a different reason (to drop down into the range where lactic acid bacteria can thrive). Have fun with your sour mash. (And be aware if it smells foul, as sour mashes sometimes do, it’s almost always from aerobic “bugs” working on the surface of the mash. You can skim them off if need be.)
Chris– if you “miss” the beta-amylase mash range, and heat your mash up past 145 F, is there a chance to get those enzymes active again if you can reduce ? Is there a range they work best in, or if you heat you mash above that temperature level are they unable to convert starches? I blew past my mash temp last brew day, up to 155 F, and had to add ice to bring it down to 149.
Beta amylase is still active above it’s optimal range. In fact, a typical single infusion mash is carried out entirely above 145 °F.
Individual beta amylase enzymes are actually more active in the single infusion mash temperature range (148–162 °F) than at 140–145 °F. Enzymes simply work faster at higher temperatures. However, they are also being unraveled by the heat (denatured) and so the pool of them is shrinking with time. By the end of a single infusion mash, the overall activity level of beta amylase has dropped severely. Individual surviving beta amylase molecules are cranking away, but their numbers are greatly reduced. (In contrast, beta amylase will keep chugging along at a slower rate., but for a much longer time, at 140–145 °F.)
So, short answer, yes. Put more directly, cooling the mash down, if you do so reasonably promptly, will allow you to retain beta amylase activity for longer than if you let it rest at a higher temperature. If you mashed in to 155 °F, then chilled the mash down to 149 °F shortly thereafter, you should have retained enough beta amylase activity to produce wort that won’t be much different than if you mashed in to 149 °F. (This is doubly true if you used high-enzyme, US malts.)
Everything I just said will make more sense if you read this first:
https://beerandgardeningjournal.com/enzymes-i/
It’s a primer on how enzymes work.
I tried to read you enzyme posts when they came on the site, “but I’m an English major, Jim, not an organic scientist!” Ha. I’ll try to muddle through them again. I get it now, though, with your summary above. Relieved that I can make corrective measures without dire consequences when I screw up my mash in. Thank you!