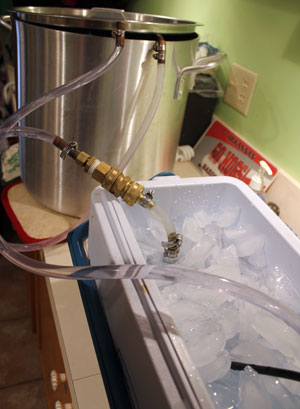
A pond pump and some ice water can really help speed wort chilling.
When I noticed the thermometer in my basement read 50˚F (10˚C), one thought popped into my head: Lager Time. Finding (or creating) a space to ferment beers at lager temperatures is a challenge. Bringing wort down to lager pitching temperature quickly and easily can be a bigger challenge. I’ve found a way to deal with that challenge in a fairly inexpensive and low-tech way.
My immersion chiller does a good job of knocking most of the initial heat out of near-boiling wort. But, at a certain time, the temperature reaches a plateau where the chilling slows down. The level of that plateau varies, depending on the season and the temperature of the ground water.
The trick to the method that I use is to circulate ice water through the immersion chiller using a cheap immersible pond pump from the local hardware store. This is even more effective than adding a second pre-chiller that is immersed in ice water, which I have tried as well.
I chose a pump that is under $30.00 that has a flow rate of around 130 gallons per hour (492 liters per hour). It took a little searching in the store to find hose and connectors to transition from the small pump outlet into the garden hose fitting of my immersion chiller. Your types of connectors may vary, depending on the type of pump and chiller you have.
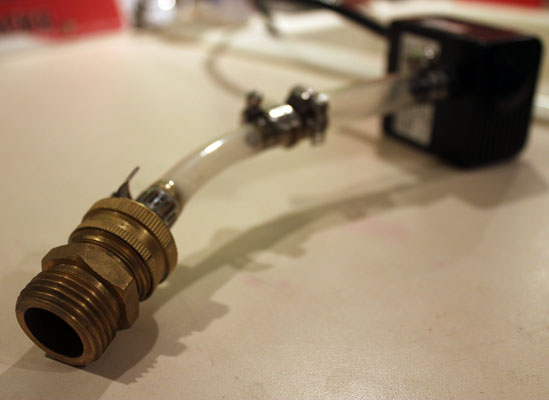
You may have to do some searching to find connectors for your setup. (Click to enlarge.)
Using the setup is simple. I use an infrared thermometer to monitor the temperature of the wort as it chills. Usually about half an hour into the chill, the chilling rate starts to slow down dramatically. That’s when I put the pump into a small picnic cooler and fill it with ice. While the immersion chiller is still hooked up to the tap, I direct the chiller outflow on top of the ice to create some ice water that the pump can start using. I then shut off the tap, connect the chiller inflow to the pump, and put the chiller outflow tube into the opposite side of the picnic cooler from the pump.
When I plug in the pump, water that is near freezing temperature starts to flow through the copper chiller. The wort temperature begins falling again. I found when I brewed yesterday that I could go from near boiling to 50˚F (10˚C) in about an hour.
To help the wort chill more quickly, you should agitate the chiller coil in the wort. Be careful in the beginning. The outflow of the chiller will be quite hot.
This is a great method to use in summer for those of us who live in warmer latitudes. When our ground water warms, it’s a challenge to get wort down even to ale pitching temperature.
Here’s the recipe I brewed this week.
Easy Peasy Pilsner
5 gal. (19 L) Batch
11 lb. (4.9 kg) German Pilsner Malt
Single infusion @ 150˚F (65˚C) for one hour
2.0 oz. (56 g) Czech Saaz pellets (90 min.)
1.0 oz. (28 g) Czech Saaz pellets (flameout)
Saflager S-23 dry yeast (2 pkg.)
OG: 1.048 FG: TBD
—
Related articles

Do you notice the pump struggling at all in this configuration? I have been meaning to try something like this, but was always afraid the low-flow pumps wouldn’t be strong enough. I suppose as long as you kept the tubing diameter large and everything on the same level, it would probably work well enough.
– Dennis, Life Fermented Blog
The flow going through the coils isn’t strong, but it’s steady. It does a good job of keeping the copper cold.
Excellent. I have never had any desire to lager anything, but in the summer my ground water is way to hot to cool my wort down to even the cooler side of an ale pitching temp. Come May/June I think I too will be acquiring a little pump.
I recently did this same thing, using an ~300 gph pump I found at Harbor Freight. I removed the copper coil I used as a pre-chiller, connected the pump and put it in a bucket where I then slowly added water from a hose to get the initial temperature down. Then I added ice to the bucket and got the wort down in the 50’s. It worked fine. The ice chest is a good idea.
Excellent. I think I may upgrade my little pump to a more powerful one.
Great article! I had been thinking about buying a second immersion chiller, to put in a cooler, but it sounds like I don’t need to do that. Taking a quick look on Harbor Freight’s site, I found what looks to be a good candidate:
http://www.harborfreight.com/16-horsepower-submersible-utility-pump-68422.html
It comes with a garden host adapter, so I wouldn’t have to do any conversions in order to attach it to my existing immersion chiller. I’m going to do some more research, but this looks like a good place to start.
Excellent!
Well, I’m hoping to brew next week and will be taking advantage of the propane shortage and record lows in Wisconsin to ferment a lager. When mother nature tries to freeze you, what should you do? Make beer, of course!
I might be able to just put the pump outside and run air through the wort chiller to finish bringing the wort down to pitching temperature.
When winter blasts, brew a lager!
I decided last summer to give this method a try as here in southern arkansas the ground water in summer can be quite warm and getting wort below the upper 70s is a real challenge. However I found that a cheap pond pump did not have enough force to push through my 50′ of immersion chiller.
I now have a $50 sump pump which I have not tried out yet, but it should do the trick.
still cheaper than a second coil and the pump is a good thing to have anyway.